How to Arrange Furniture in a Long Narrow Living Room for a Stylish, Functional Space
Posted by Harvey Bruce on
Ever walked into a living room that feels like a hallway, where every step just slides past the same wall? It’s that cramped, endless‑looking vibe that makes you sigh and wonder if you’ll ever enjoy the space. That’s exactly what we’re tackling when we talk about how to arrange furniture in a long narrow living room.
You’re not alone – many homeowners dreaming of a luxe feel hit this same snag. The good news is that a few strategic tweaks can turn that tunnel‑like layout into a cosy, gallery‑style lounge that still feels spacious. Think of it as rearranging the pieces on a chessboard, only the pieces are your sofa, chairs, and that gorgeous bespoke coffee table you’ve been eyeing.
First, visualise the room as a series of zones rather than one long rectangle. One end can host your main seating area, the middle might showcase a statement rug or art piece, and the opposite side could become a subtle reading nook or a sleek console for storage. By breaking the length into purposeful sections, you instantly add depth and interest.
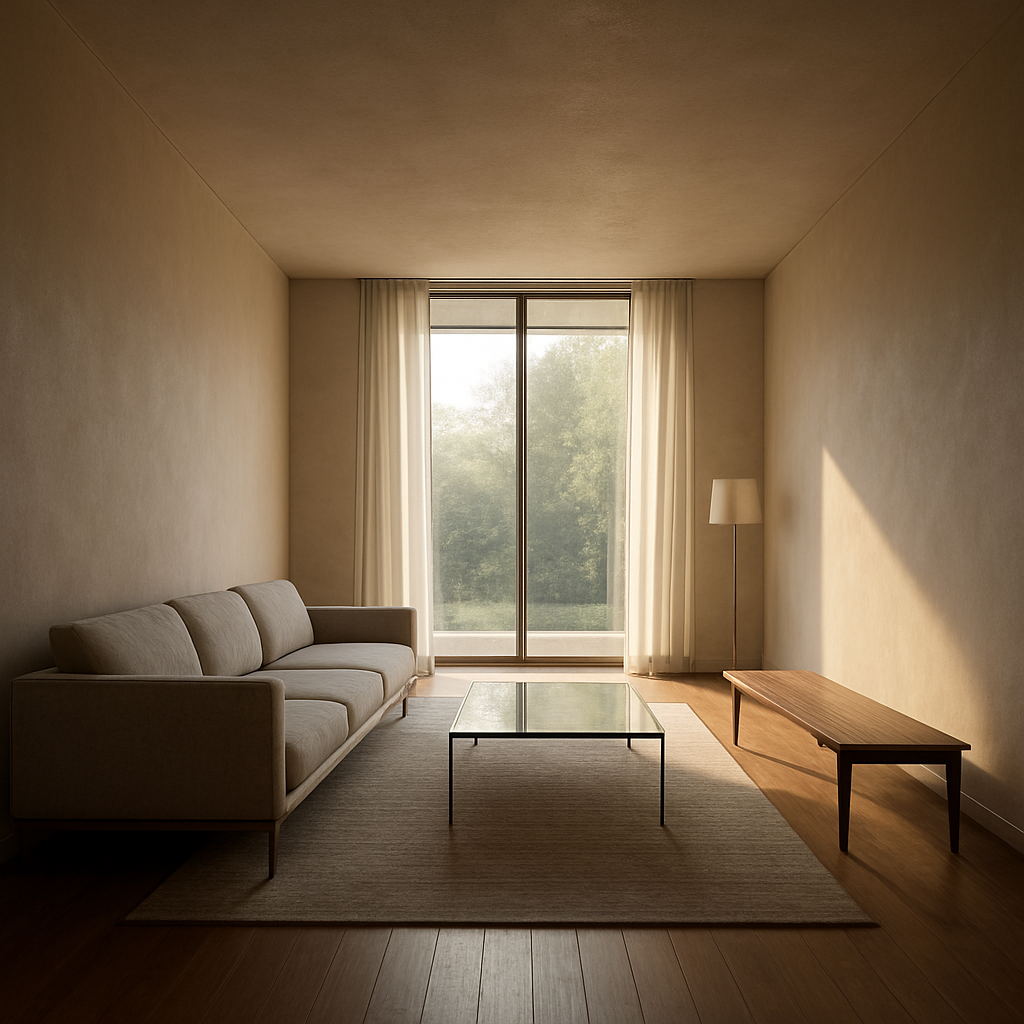
Next up, pick a focal point that draws the eye across, not down, the length. A striking pendant lamp, a large mirror, or a beautifully crafted bespoke bench can serve that purpose. When you anchor the room with something bold at one end, the eye naturally travels the space, making the room feel balanced instead of stretched.
Scale matters, especially in a skinny layout. Choose low‑profile sofas or sectional pieces that hug the back wall, leaving room for circulation. A slim, tapered armchair or a set of nesting tables can add function without crowding the flow. Remember, every inch you save on bulk is an inch you gain for movement.
Create a clear traffic lane – think of it as the runway for daily life. Keep at least 90 cm (about three feet) of clearance between pieces so you can glide through without bumping into a coffee table. If you’re unsure, lay a rug runner first; it instantly maps the pathway.
Lighting and texture finish the picture. In our experience at Harvey Bruce Interiors, we find that tall floor lamps placed opposite the seating draw the eye upward, breaking the room’s length. Pair a plush, natural‑woven rug with a few curated accessories – perhaps a handcrafted ceramic vase from our bespoke collection – to add warmth and visual layers.
So, what’s the next step? Grab a tape measure, sketch your floor plan on graph paper, and start moving the big pieces around – no need to buy anything new just yet. Play with the zones, test the traffic lane, and watch the room transform from a corridor into a stylish, livable haven.
TL;DR
Create zones in a long narrow living room, anchor each end with a statement piece, and leave a 90 cm traffic lane so you can move freely.
Use low‑profile, tapered furniture, a tall floor lamp opposite the seating, and a natural‑woven rug, plus Harvey Bruce’s bespoke accessories, for balanced, cosy style.
Step 1: Measure and Map Your Long Narrow Living Room
First thing's first – before you start moving sofas around, you need to know exactly what you’re dealing with. That feeling of walking into a hallway‑like lounge disappears as soon as you have a clear map of the space.
Grab a measuring tool
A good old tape measure does the trick, but a laser distance meter saves time if you’ve got one. Measure the length from wall to wall, then note the width at the narrowest point – often around a door frame. Don’t forget the height of the ceiling, the size of any built‑ins and the clearance around doors.
Sketch a scale plan
Take a sheet of graph paper and decide on a simple scale – for example one square equals ten centimetres. Draw the perimeter, then add windows, doors and any permanent features. Next, cut out paper templates of your key pieces – sofa, armchair, bench – and slip them onto the grid. This visual exercise shows you instantly whether a low‑profile sofa will hug the back wall or crowd the traffic lane.
Once your sketch is on the floor, step back and visualise three zones – a seating area, a rug or artwork focal point, and a secondary nook for reading or display. Mark a 90 cm (about three feet) clear pathway between them; that’s your traffic lane. If the lane feels tight, shuffle the templates until you have at least that breathing space.

Now that you’ve mapped every inch, you’re ready for the next stage – arranging the pieces to flow with that lane. Grab your tape, pull out the sofa, and start experimenting. You’ll be amazed how a simple measurement can turn a tunnel‑like room into a cosy, gallery‑style lounge.
Step 2: Define Functional Zones and Traffic Flow
Now that you’ve got a rough sketch, it’s time to think in “vignettes” instead of a single monolithic room. Picture the length as a series of mini‑rooms – a cosy seating nook, a display zone for art or a console, and a quiet reading corner. Each pocket should have a purpose, and the purpose should guide the furniture you choose.
Start with the biggest piece – usually the sofa. Push it against the back wall, but leave at least 90 cm of clearance on either side for a clear traffic lane. Then add a pair of low‑profile chairs angled toward each other; this creates an intimate conversation island without choking the flow.
Next, define a secondary zone. A slender bench or an elegant bench placed perpendicular to the sofa can act as a subtle divider while offering extra seating. Because it’s narrow, it doesn’t steal floor space, yet it visually breaks the length into two balanced sections.
Use rugs to anchor each zone – a runner under the main seating, and a smaller patterned rug under the bench area. As designers at Homes & Gardens note, a change in texture or colour signals a new functional area without the need for walls.
Don’t forget lighting. A floor lamp on the far side of the traffic lane pulls the eye across the room, while a pendant over the reading nook adds vertical interest. If you need extra illumination, consider a specialist installer – LED Artistry can help you integrate sleek, dimmable fixtures that respect the narrow profile.
Finally, add a finishing touch to the wall space between zones. A striking landscape piece from Gratitude Studios not only fills the visual gap but also ties the whole layout together with colour and personality.
Step 3: Choose the Right Furniture Scale and Layout Options
Now that you’ve zoned the room, the next puzzle is the scale of each piece and how they sit together. When you’re figuring out how to arrange furniture in a long narrow living room, size really does matter.
Start with low‑profile sofas or sections that hug the back wall. A piece that’s under 80 cm tall keeps the ceiling feeling higher, and a slim depth (under 90 cm) leaves breathing room for the traffic lane you built earlier. And if you love a bit of drama, a tapered armchair with narrow legs adds height without bulk.
What if your sofa feels like a ship stuck in a hallway? You’ll notice it right away – you can’t swing a coat rack without nudging it. That’s a sign you need to down‑size or swap for a slimmer silhouette.
Look for furniture with exposed legs or glass tops. They create visual lightness, letting the eye travel down the length instead of getting stuck on massive blocks. In our experience, a sleek coffee table with a thin metal frame works wonders for narrow rooms.
Play with layout options
Try floating the main seating away from the wall by a few inches. This opens the visual corridor and lets you slip a narrow console or a pair of nesting tables behind the sofa for storage. Parallel arrangements – two chairs back‑to‑back with a slim ottoman in the middle – can break the length into bite‑size zones without adding extra walls.
Another trick is to place a long, low bench perpendicular to the wall, creating a subtle divider that still respects the room’s narrow profile. The layout ideas for narrow living rooms often recommend this kind of “floating island” to keep flow smooth.
Does that feel right? Walk the imagined path with your shoes on – if you can swing your arms without brushing a leg, you’ve hit the sweet spot.
Grab a tape measure, shift one piece a few centimetres, and re‑check the 90 cm clearance. Small tweaks now save you a major rearrange later.
When the scale feels right, the layout falls into place – and the room finally stops feeling like a hallway.
Step 4: Incorporate Wooden Plantation Shutters for Style & Energy Efficiency
So you’ve got your zones and traffic lane sorted – now think about the windows. In a long narrow living room, the right window treatment can be the secret sauce that pulls the whole look together while shaving a few degrees off your heating bill.
Why wooden plantation shutters work
Wooden shutters give you clean lines that echo the sleek profile of low‑profile sofas. Because the slats are solid, they block drafts better than fabric curtains, keeping the warm air you’ve coaxed into the room from slipping out the side.
Imagine a chilly morning: you pull the shutters shut, and the room feels cozier, the radiator doesn’t have to work overtime. That’s real energy savings, not just a pretty claim.
Pick a finish that plays with your layout
Light‑coloured oak or walnut adds a warm glow that brightens the length of the space, while dark mahogany can ground a room that feels too stretched. If you’ve layered a light rug under the seating zone, a matching light shutter helps the eye travel horizontally, making the room feel wider.
Tip: Choose a tilt‑adjustable design so you can angle the slats to let in just enough daylight without glare on the TV or artwork.
Installation tricks for narrow walls
Measure the window opening exactly – even a centimetre off can throw off the balance of the whole room. Mount the shutters inside the frame if you want a built‑in look; it frees up a few precious centimetres of wall space for hanging art or a narrow console.
And because the shutters sit close to the wall, you can place a slim side table or a narrow bookshelf right behind them without crowding the traffic lane.
In our experience at Harvey Bruce Interiors, clients love the way bespoke wooden shutters complement our handcrafted furniture, creating a unified, luxurious vibe that feels both stylish and practical.
Ready to give your narrow living room that polished, energy‑smart finish? Pick the wood tone that mirrors your furniture palette, order a custom set, and watch the room transform in a single afternoon.
Step 5: Add Bespoke Accessories and Final Styling Touches
Now that the shutters are up and the zones are mapped, it’s time to sprinkle the personality that makes a long narrow living room feel lived‑in, not a hallway.
Layered textures and statement pieces
Think about the textures you love – a hand‑woven rug, a brass lamp, a velvet cushion. In a slim space each material adds depth without hogging floor area. A single oversized mirror on the far wall, for example, bounces light the length of the room and tricks the eye into seeing more width.
Does a bold piece feel out of place? Not when it’s anchored to a bespoke accessory from Harvey Bruce – a sculptural ceramic vase or a custom‑crafted wooden tray that echoes the shutter finish. Because the piece is purposeful, it becomes a focal point rather than clutter.
Curated accessories that pull the zones together
Use the space between zones to showcase a curated shelf of books, a few curated travel‑souvenirs, or a row of low‑profile side tables. A narrow console behind the shutters can hold a scented candle and a small stack of design magazines, adding warmth without blocking the traffic lane.
And what about colour? A handful of coordinating throw pillows in the same hue as your shutters ties the whole layout together, creating a visual thread that runs the length of the room.
Need inspiration? Architectural Digest offers a roundup of small‑living‑room ideas that show how layered accessories can make a compact space feel luxurious here.
So, what’s the next move? Pick two accessories that you love, place them where the eye naturally lands, and step back. If the room still feels tight, swap a piece for something with a lighter silhouette – the room will thank you.
Comparison Table: Layout Options vs Space Efficiency
So you’ve tried zones, traffic lanes and those sleek shutters – now you’re staring at the floor wondering which furniture arrangement will actually let the room breathe. The truth is, each layout option trades a bit of visual drama for a bit of walking room, and knowing the balance helps you decide.
Take an L‑shaped sectional. It tucks into the corner, uses dead space and gives you a cosy lounge, but it also claims a sizable footprint. If you love movie nights and need a built‑in chaise, it’s a winner – just watch the clearance around it.
Floating a low‑profile sofa a few inches off the back wall creates a visual corridor. You keep the line of sight open and you can slide a narrow console behind the sofa for storage without choking the lane.
And a perpendicular bench or slim wooden divider can split the length into two zones without adding bulk. Because it’s narrow, it acts like a subtle wall, guiding traffic while still feeling airy.
Which one feels right for you? Let’s break it down in a quick table.
| Layout Option | Space Efficiency | Ideal Use |
|---|---|---|
| L‑shaped sectional | Medium – occupies corner but uses dead space | Homes that want a built‑in lounge and chaise |
| Floating low‑profile sofa | High – creates a clear pathway and visual flow | Rooms where traffic lane is priority |
| Perpendicular bench divider | High – thin profile, defines zones without crowding | Spaces needing a subtle room split |
Want more detail on why an L‑shaped sectional can still work in a narrow room? Castlery explains how the right geometry and raised legs keep the space feeling open. Read their guide on L‑shaped sectional for small spaces. Remember, the goal isn’t to cram every piece you love in – it’s to let each item earn its spot, so you can actually walk around without bumping into anything.
Take a tape, lay out the footprint with painter’s tape, and see which option leaves at least 30‑36 inches of breathing room. Once you’ve found the sweet spot, the long narrow living room will finally feel like a curated gallery, not a hallway.
Conclusion
We’ve walked you through measuring, zoning, picking the right scale, and even adding those final touches that make a long narrow living room feel like a curated gallery.
When you step back now, do you see a clear traffic lane of at least 90 cm, a balanced focal point, and a few purposeful pieces instead of a hallway of furniture? If the answer is “yes,” you’ve nailed how to arrange furniture in a long narrow living room.
Remember, the magic lives in the details: a low‑profile sofa floated just a few inches from the wall, a slim bench that quietly divides zones, and a textured rug that anchors each area. Those small adjustments free up space and let light travel the length of the room.
So what’s the next move? Grab your tape, lay down painter’s tape to outline the footprint, and test the clearance with your favourite pieces. If something feels cramped, shift it a centimetre – that tiny tweak can turn a tight passage into a graceful flow.
Finally, let your personality shine through a couple of bespoke accessories from Harvey Bruce Interiors. A carefully chosen vase or a hand‑crafted tray can tie the zones together without adding bulk.
Take a breath, enjoy the new rhythm of the room, and know you’ve created a space that’s both luxurious and livable.
FAQ
What’s the first step when figuring out how to arrange furniture in a long narrow living room?
Start with a quick measurement and a simple floor‑plan sketch. Grab a tape measure, note the length of each wall, window, and any built‑in features, then draw the outline to scale on graph paper or a free online planner. Seeing the numbers on paper lets you visualise zones, traffic lanes, and where each piece will actually sit before you lift a single item.
How can I create a clear traffic lane without sacrificing style?
Leave at least 90 cm (about three feet) of unobstructed width between furniture clusters. Position a low‑profile sofa against the back wall, then float it a few inches away so a slim console or nesting tables can slip behind without crowding the path. A narrow runner rug can mark the lane and add texture, while a tall floor lamp on the opposite side draws the eye across the space, keeping the flow elegant.
Should I use a sectional or separate pieces in a narrow layout?
Both can work, but separate pieces usually give you more flexibility. A sleek, tapered armchair or a narrow bench can break up the length without the bulk of an L‑shaped sectional. If you love the sectional vibe, choose one with exposed legs and a shallow depth, then pair it with a slim coffee table. The key is to keep the footprint low so the lane stays open.
How do I choose the right rug size for a long narrow room?
Pick a rug that anchors each zone without overwhelming the floor. A runner that stretches under the main seating area and stops before the next zone creates visual separation while defining the traffic path. If you have two distinct areas, use two smaller rugs—one under the sofa set and another under the bench or reading nook. This layered approach adds warmth and guides movement.
Can lighting help make a narrow living room feel wider?
Absolutely. Tall floor lamps placed at the far end of the room pull the eye upward, breaking the length. Pair them with a pendant or wall‑mounted fixture above a focal point—like a statement artwork or the bench—to create vertical interest. When the ceiling feels taller, the room’s width seems more generous, and the lighting also highlights the zones you’ve created.
What role do bespoke accessories play in finishing the arrangement?
Bespoke accessories add personality without adding bulk. A handcrafted ceramic vase, a slim metal tray, or a single piece of art can become a focal point that ties the zones together. Because they’re purposeful, they don’t clutter the floor. Choose pieces that echo the material or colour of your shutters or furniture, and you’ll get a cohesive look that feels curated rather than crowded.
How often should I re‑evaluate my layout as my needs change?
Give it a quick test every few months or whenever you add a new piece. Walk the traffic lane with shoes on—if you can swing your arms without nudging anything, you’re good. If a new coffee table or a change in season makes you want a cozier nook, adjust the bench or swap a chair. Small tweaks keep the space feeling fresh and functional without a full redesign.
← Older Post Newer Post →
