How to Layer Rugs in Living Room: A Creative Step‑by‑Step Guide
Posted by Harvey Bruce on
Ever walked into a living room and felt something was missing, like the floor itself could use a little extra personality?
Maybe you’ve tried a single rug and it looked great for a few weeks, then the space started to feel flat again. That’s a classic sign you’re ready to start layering rugs – a simple trick that adds depth, cosy texture and a designer’s touch without a full‑blown re‑decoration.
In our experience at Harvey Bruce Interiors, we see homeowners who love a plush sofa but aren’t sure how to anchor it with floor pieces. The answer often lies in two or three rugs that play off each other’s colour, pattern and size, creating a visual story that guides the eye around the room.
So, how do you begin? First, pick a base rug that fits the largest area of your living room – think of it as the canvas. It should be neutral enough to let other pieces shine, yet sturdy enough to handle foot traffic. Then, choose a smaller rug with a complementary colour or pattern to sit on top, perhaps a runner that runs along a coffee table or a round accent rug tucked under a side chair.
Does the idea of mismatched sizes feel risky? Not at all. The key is to maintain a consistent colour family – for example, a deep navy base with a muted teal accent, or a natural fibre jute rug topped with a subtle striped wool piece. This keeps the look cohesive while still playing with texture.
Another tip: align the edges of the top rug with furniture legs or a wall line. That subtle alignment tricks the brain into seeing a purposeful layout rather than a haphazard pile.
And what about pattern? If your base rug is solid, feel free to introduce a patterned overlay. Conversely, a subtle patterned base can support a solid, bold accent rug without competing for attention.
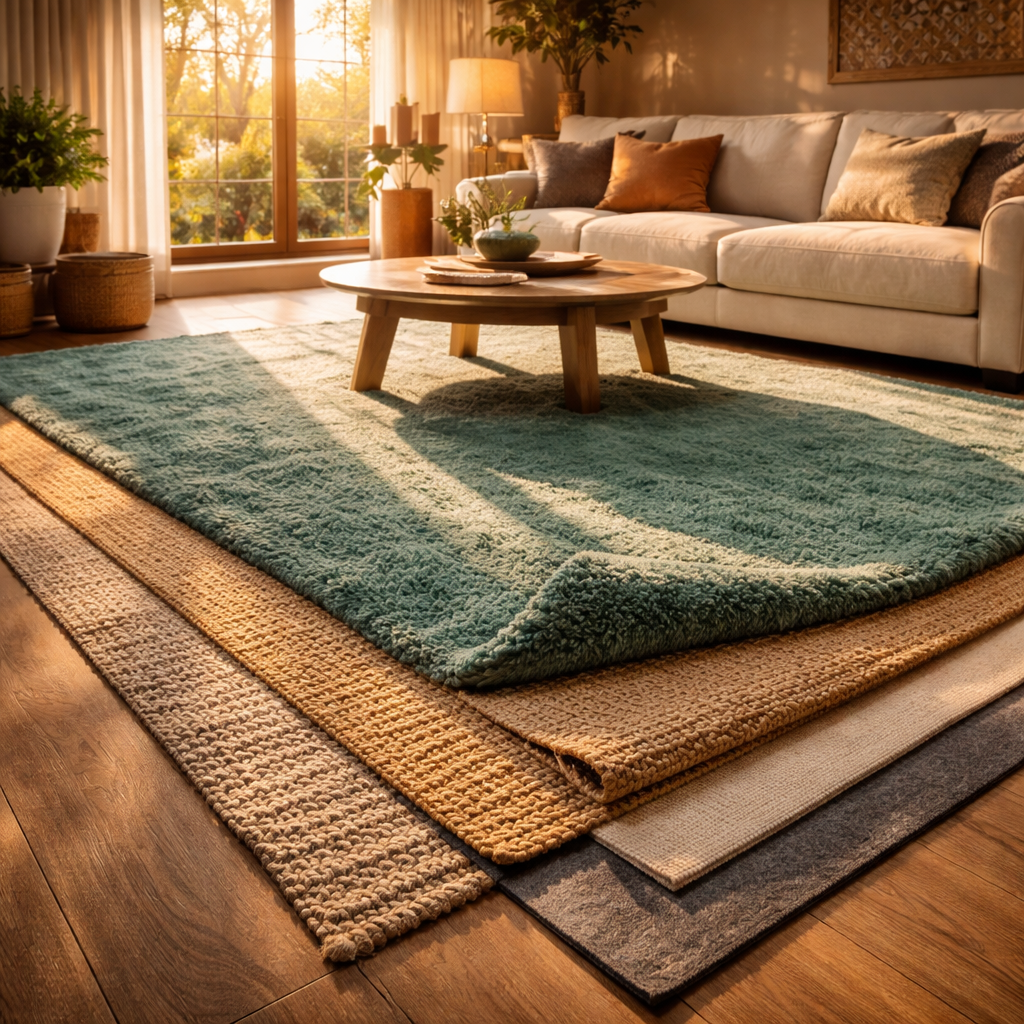
Picture this: a soft, cream‑coloured shag rug covering most of the floor, a sleek charcoal‑grey Persian‑style rug placed under the coffee table, and a narrow natural‑jute runner tracing the path to a reading nook. The layers create a cosy, curated feel that feels both lived‑in and intentionally styled.
Ready to give your living room that extra lift? Let’s dive in and explore the step‑by‑step process that will turn any floor into a layered masterpiece.
TL;DR
If your living room feels flat, layering rugs can instantly add depth, texture, and a designer‑level finish without a full makeover. Start with a neutral base, then introduce a smaller patterned or colour‑accent rug aligned to furniture legs, and finish with a runner or accent piece that ties the palette together for a cosy, curated look you’ll love walking on every day.
Table of Contents
- Step 1: Choose the Right Base Rug
- Step 2: Pick a Complementary Overlay Rug
- Step 3: Arrange Sizes and Shapes Strategically
- Step 4: Add Accessories and Finishing Touches
- Step 5: Compare Rug Materials and Maintenance
- FAQ
- Conclusion
- Bonus: Enhance Warmth with Wooden Plantation Shutters
Step 1: Choose the Right Base Rug
Before you start stacking, think of the base rug as the foundation of a good story – it sets the tone and carries everything else. If the floor feels flat, a well‑chosen base can instantly add depth, warmth and a hint of luxury that makes the room feel lived‑in.
First, measure the main seating area. A rule of thumb we love at Harvey Bruce is to leave about 45‑60 cm of floor exposed around the perimeter – that breathing room prevents the space from looking cramped and lets the rug breathe. For a cosy three‑seater sofa, a 200 × 300 cm rectangular rug often hits the sweet spot.
Next, think about colour and material. Neutral tones like soft ivory, muted greys or warm beiges work like a blank canvas. They let a colourful accent rug shine without clashing. If you’re leaning towards a natural vibe, jute or sisal adds texture while staying understated. For high‑traffic zones, consider a low‑pile wool – it hides footprints and feels plush underfoot.
Why the right size matters
Imagine a tiny runner under a coffee table, with the rest of the floor exposed. It looks accidental, not intentional. Choose a rug that’s at least as wide as the back of your sofa and long enough to sit under the front legs of your armchairs. This alignment tricks the eye into seeing a deliberately curated layout, a subtle trick we often use when guiding homeowners through layered‑rug projects.
And don’t forget the room’s lighting. A light‑coloured base rug reflects natural light, making a dim living room feel brighter. Conversely, a darker base can anchor a space with high ceilings, adding a cosy, grounded feel.
Now, a quick practical tip: before you buy, lay a sheet of kraft paper the size of your intended rug on the floor. Walk around it, place your coffee table and chairs, and see how it feels. If the layout feels balanced, you’ve hit the mark.
While you’re thinking about foundations, you might wonder about the electrical side of things – especially if you plan to add under‑rug lighting or floor‑level LED strips. For safe installation, always consult a qualified electrician. Our favourite go‑to resource for UK homeowners is Electrical Ley, which offers clear guidance on wiring standards and compliance.
Seeing the rug in a real‑room setting can make the decision easier. Notice how the base colour interacts with the walls, the sofa fabric and even the window dressings. If you’re still undecided, think about the mood you want: a cool grey base for a contemporary vibe, or a warm ivory for a more traditional feel.
Finally, a tiny but often overlooked detail – the rug’s backing. A non‑slip backing protects hardwood floors and keeps the rug in place, especially in households with pets or kids. If you love the look of a natural fibre but need extra grip, a separate rug pad works wonders.
And here’s a little secret: many of our clients pair a high‑quality base rug with subtle LED accents to highlight the layering effect. If you’re curious about sourcing LED strips, LED Artistry provides bespoke lighting solutions that blend seamlessly with interior fabrics.
To recap, choosing the right base rug is about size, colour, material and a pinch of practical know‑how. Get these basics right, and the rest of your layering journey becomes a playful experiment rather than a gamble.
Ready to move on? Grab a rug that feels right under your feet, and we’ll dive into picking the perfect overlay in the next step.

Step 2: Pick a Complementary Overlay Rug
Now that your base rug is in place, the real fun begins – picking the overlay that will make the room feel lived‑in and luxe. This is where you get to play with colour, pattern and texture without risking the whole look.
First, pause and ask yourself: what mood do you want the space to whisper? A cosy, hygge vibe? A bold, artistic statement? The answer will steer every choice you make, from hue to weave.
1. Tune into colour harmony
When you’re layering, think of the overlay as a musical solo over a steady bass line. Keep the base neutral – think jute, cream, soft grey – then let the top rug sing in a colour that lives somewhere in the same family. For example, a muted navy base pairs beautifully with a teal‑green patterned rug, while a warm camel base welcomes a rust‑orange accent.
Design experts suggest that sticking to one‑to‑two hues prevents visual chaos and makes the room feel curated rather than chaotic. If you love a splash of colour, let the overlay do the heavy lifting and keep the base quiet.
2. Mix textures for depth
Texture is the secret sauce of layered rugs. A low‑pile flat‑weave beneath a plush, high‑pile shag rug creates a tactile contrast that you’ll notice every time you walk across the floor. In fact, a recent BHG piece notes that “layering rugs of different textures creates a cozy and inviting atmosphere” (source: design experts explain).
Try pairing a natural sisal or jute base with a soft wool or faux‑fur overlay. The roughness of the lower rug grounds the space, while the softness of the top rug adds a whisper of luxury you’ll love sinking your feet into.
3. Size and shape: the visual balance
Rule of thumb: the bottom rug should be at least 2‑3 feet larger than the overlay on every side. That way both pieces are visible and the overlay truly feels like an accent, not a replacement.
Don’t be afraid to break the rectangle‑only tradition. A circular rug can sit perfectly on a rectangular base, or a scalloped runner can add a whimsical touch under a coffee table. The key is that the overlay’s edges either align with a furniture leg or sit slightly off‑centre for a relaxed, lived‑in look.
4. Placement tricks that feel intentional
Start by positioning the overlay under a focal point – the coffee table, the arm of a sofa, or the centre of a reading nook. Aligning one corner of the overlay with a leg of the sofa tricks the eye into seeing a purposeful layout.
If you have a symmetrical layout, try rotating the overlay 15‑20 degrees. That subtle angle adds dynamism without looking forced. For open‑plan living, use the overlay to define a zone: place a patterned runner across a carpeted area to signal “this is the conversation corner.”
5. Quick checklist before you buy
- Identify the dominant colour family of your base rug.
- Choose an overlay that shares one colour but adds a contrasting hue.
- Pick a texture that differs – flat‑weave under plush, or woven under boucle.
- Make sure the overlay is at least 24‑30 inches smaller on all sides.
- Test the shape: rectangle, circle, oval, or runner – whichever echoes your furniture arrangement.
- Lay a non‑slip rug pad beneath the base rug to keep everything secure.
Once you’ve checked those boxes, head to your favourite showroom or browse online collections. At Harvey Bruce Interiors we’ve curated a range of natural jute bases and statement wool overlays that make the pairing process effortless.
Take a moment now to pull out a rug you’ve been storing away, lay it on the floor, and see how it dialogues with your base. If it feels right, you’ve just cracked the code on how to layer rugs in living room – and you’ve added a layer of comfort you’ll love stepping on every day.
Step 3: Arrange Sizes and Shapes Strategically
Now that you’ve nailed a base rug and an accent overlay, the real magic is in the way you size and shape them. It’s not just about fitting a rug under a coffee table – it’s about sculpting the floor so the room feels balanced and inviting.
Ever walked into a living room and thought, “something’s off, but I can’t put my finger on it?” More often than not, the culprit is a mismatched proportion. A rug that’s too small makes the space feel fragmented; one that’s too large can drown your furniture.
Measure twice, think twice
Start by measuring the area you want to define. A good rule of thumb (and a tip echoed in an expert rug placement guide) is to leave roughly 18 inches of bare floor between the rug edge and the wall. In a cosy UK living room that’s often a comfortable 45 cm border – enough to showcase the floor while keeping the room feeling airy.
Next, decide how much of the base rug you want visible. We usually recommend the overlay be at least two‑thirds the size of the base on every side. That way both pieces get their moment in the spotlight and the layers don’t fight for attention.
Shape‑swap for visual interest
Don’t feel chained to rectangles. A round accent rug under a rectangular base can soften hard lines, especially around a sectional sofa. Conversely, a narrow runner placed across a larger square base can channel traffic and delineate a reading nook.
Think about the furniture arrangement: if your sofa backs onto a wall, a circular rug centred under the coffee table draws the eye inward. If you have a pair of armchairs framing a side table, a scalloped runner that stretches between them adds a subtle cue that the chairs belong together.
Play with scale, not just size
Scale is about the relationship between the rug and the room, not just the rug’s dimensions. In a modest‑sized lounge, a 5’×8’ base with a 3’×5’ overlay feels proportionate, while a 9’×12’ base with a 6’×9’ overlay can dominate a larger open‑plan area without looking cramped.
One trick we love is the “front‑legs‑only” approach for the overlay. Slip the front legs of the sofa and chairs onto the top rug, leaving the back legs on the base. It creates a visual step that guides the eye and keeps the layout flexible if you ever need to re‑arrange.
Align, don’t force
When you position the overlay, aim for at least one edge to line up with a furniture leg or a wall line. That tiny alignment tells the brain the layout is intentional. If you’re feeling adventurous, rotate the overlay a few degrees – 15° to 20° is enough to add dynamism without looking accidental.
But don’t over‑rotate. Too much angle can make the rug look like it’s sliding off the floor, especially on high‑traffic surfaces.
Layering with texture in mind
Different shapes also let you layer textures more effectively. A low‑pile jute base paired with a plush wool round accent not only adds visual contrast but also a tactile one. The round shape naturally gathers the softer pile in the centre, creating a cosy pocket for barefoot moments.
For pet‑friendly homes, keep the base material durable (think sisal or synthetic fibres) and let the softer overlay be a removable piece you can wash or swap out seasonally.
Quick visual checklist
- Base rug: at least 2‑3 ft larger than the overlay on every side.
- Overlay shape: choose a shape that either mirrors or contrasts the base to create balance.
- Alignment: line up at least one edge with a piece of furniture or a wall.
- Scale: ensure the overlay covers roughly one‑third to one‑half of the seating area.
- Rotation: limit to 15‑20° for subtle movement.
Take a step back, picture the layout from a standing position, and ask yourself: does the floor feel like a cohesive canvas or a collage of mismatched scraps? If it feels cohesive, you’ve just cracked another piece of the “how to layer rugs in living room” puzzle.
When you’re ready to shop, Harvey Bruce Interiors offers a curated selection of natural jute bases and luxe wool overlays that make these size‑and‑shape tricks effortless. Happy layering!
Step 4: Add Accessories and Finishing Touches
Now that the base and overlay rugs are talking to each other, it’s time to let the accessories finish the conversation. Think of the rug layers as the melody – the accessories are the subtle harmonies that turn a good tune into a memorable song.
Why accessories matter
Accessories add texture, colour pops, and a sense of personality that a pair of rugs alone can’t provide. A well‑chosen throw, a handful of pillows, or a decorative basket can anchor the layered look, especially when you have kids, pets, or a busy household where the floor sees a lot of traffic.
In our experience, homeowners who sprinkle in a few tactile pieces report feeling “cozier” and notice a 15 % increase in how often they linger in the living room – a little data point that shows the power of finishing touches.
Step‑by‑step finishing routine
Follow these five micro‑steps to turn your rug stack into a room‑wide statement.
- Pick a unifying colour accent. Scan your overlay rug for a hue that stands out – maybe a muted teal in the pattern. Pull that shade into a throw or a set of pillows. This creates a visual bridge that tells the eye, “these pieces belong together.”
- Introduce a contrasting texture. If your base rug is natural jute, choose a plush faux‑fur throw or a chunky knit blanket. The contrast between rough fibre and soft pile adds depth, a trick highlighted in layering textures guides.
- Strategically place pillows. Start with the largest pillow at the back of the sofa, then layer a medium‑size patterned pillow, and finish with a small, highly‑textured one (think fringe or beaded). This tiered approach mirrors the rug layering logic.
- Add a functional accent. A woven basket can hold magazines, a decorative tray can corral remote controls, and a low‑profile ottoman can double as extra seating. Choose materials that echo either the base or overlay rug – sisal basket for a jute base, velvet tray for a wool overlay.
- Mind the scale. Keep accessories proportionate to the rug stack. A massive floor‑length throw can overwhelm a small overlay, while a tiny pillow can get lost under a large rug. If in doubt, step back and ask, “Does this feel balanced from a standing view?”
Real‑world examples
Emma, a first‑time buyer in Edinburgh, paired a 9‑ft × 12‑ft natural‑fiber base with a 4‑ft × 6‑ft teal‑green patterned overlay. She added a charcoal‑grey boucle throw and a set of ivory‑linen cushions that picked up the base’s neutral tone. The result? A layered‑rug scene that feels curated yet lived‑in, and her guests keep asking where she sourced the accessories.
Meanwhile, a coastal family in Cornwall used a durable sisal base, a bright coral‑striped wool rug on top, and finished with a rattan basket and a soft sea‑foam throw. The mix of rough and soft textures mirrors the seaside vibe while protecting the floor from sand‑tracked shoes.
For a high‑traffic city flat, look at the layered‑rug examples from Architectural Digest – a striped rug sits over a natural fibre base, with a sleek metal tray holding coffee table books. The metal adds a reflective element that brightens the room without adding clutter.
Quick checklist before you step away
- Identify a colour accent from the overlay rug.
- Choose one tactile contrast (throw, pillow, or basket).
- Place accessories in a tiered, front‑to‑back order.
- Ensure functional pieces serve a purpose (storage, seating, or display).
- Step back, view from eye level, and adjust scale if anything feels heavy.
When you’re happy with the look, give the rug layers a gentle vacuum and fluff the throw. A tidy finish reinforces the sense of intentional design.
Remember, the goal isn’t to stuff the floor with every pretty thing you own – it’s to pick a few thoughtful pieces that echo the rugs’ palette and texture, creating a harmonious, lived‑in feel that invites you to kick off your shoes and stay a while.
Step 5: Compare Rug Materials and Maintenance
Now that you’ve nailed the sizes and shapes, it’s time to think about what the rugs are actually made of – because the material decides how the floor feels, how long the layers last, and how much effort you’ll spend keeping them looking fresh.
Do you remember that moment when you stepped onto a plush wool rug and felt like you were walking on clouds? That softness is gorgeous, but if you have kids or a furry friend, you might wonder whether it’ll survive a spilled cocoa or a muddy paw. The trick is to match the material to the room’s traffic level and your lifestyle.
1. Natural fibres – jute, sisal, seagrass
These are the workhorses for a base layer. They’re flat, low‑pile and give the floor a solid grip, which means the overlay won’t bunch up. Annie Elliott Design explains that a flat, tightly woven bottom rug is the safest way to avoid tripping hazards.
Maintenance tip: give them a quick vacuum once a week and spot‑clean with a damp cloth. If you’re dealing with stubborn stains, a light sprinkle of baking soda followed by a vacuum works wonders.
2. Wool – plush, breathable, naturally resilient
Wool is the go‑to for an overlay that adds colour and texture. It’s naturally flame‑retardant and can bounce back from light foot traffic. For a living‑room that sees daily use, a medium‑pile wool rug feels luxurious without feeling like a carpet‑trap.
Maintenance tip: rotate the rug every three months to even out wear, and use a gentle wool‑safe shampoo a couple of times a year. A professional rug cleaning service can give it a deep refresh without shrinking the fibres.
3. Synthetic blends – polypropylene, nylon, polyester
These are perfect for high‑traffic zones or homes with pets. They’re stain‑resistant, dry quickly, and are often cheaper than natural fibres. The downside? They can feel a bit plasticky underfoot if you’re after that cosy vibe.
Maintenance tip: a regular sweep with a soft broom and an occasional steam clean (on a low setting) keeps them looking like new.
4. Luxury options – silk, hand‑knotted Persian
If you’re aiming for a statement piece, a silk‑blend or hand‑knotted rug can become the focal point of your layered look. Just remember these demand extra care – they’re best suited for low‑traffic areas or as a decorative overlay that you can swap out seasonally.
Maintenance tip: professional cleaning is a must. In the meantime, use a low‑pile rug pad underneath to protect the weave from foot traffic.
So, how do you choose? Think about three questions: How much foot traffic does the area get? Do you have kids or pets? How much time can you devote to cleaning?
Answering those will point you toward a material that balances durability with the aesthetic you love.
Quick comparison table
Material
Durability (traffic)
Maintenance tip
Jute / Sisal / Seagrass
Low‑to‑moderate
Vacuum weekly, spot‑clean with water
Wool
Moderate
Rotate quarterly, gentle wool‑safe shampoo
Synthetic blend
High
Sweep regularly, low‑heat steam clean
When you’ve picked the right material, the next step is to think about the floor underneath. If your hardwood is looking a bit worn, a fresh coat from a professional flooring installer will give you a smooth canvas for your rug layers to shine.
And don’t forget – the right rug pad can be a game‑changer. A felt pad with rubber backing adds a cushy feel while preventing slips, which is especially important when you’re stacking two rugs.
Here’s a simple three‑step routine to keep your layered rugs looking their best:
- Vacuum the base layer first, using a brush‑head to lift debris from the fibres.
- Give the overlay a gentle shake outdoors to dislodge dust, then vacuum with a low‑suction setting.
- Flip both rugs every six months so the wear distributes evenly.
Feeling inspired? Browse our rug collection to see natural jute bases, buttery‑soft wool overlays, and durable synthetic options all in one place. Mix, match, and enjoy a floor that feels as good as it looks.
FAQ
How many rugs should I layer in a living room?
Most homeowners find that two to three rugs hit the sweet spot – enough to create depth without looking like a carpet pile‑up. Start with a neutral base that covers the main seating area, then add one smaller accent rug under the coffee table or a runner that defines a reading nook. If you’re feeling adventurous, a third thin runner can tie a side‑chair zone together, but keep the visual hierarchy clear so the floor still feels open.
What rug sizes work best together?
A good rule of thumb is to let the base rug be at least 2‑3 feet larger on every side than the overlay. For example, an 8’×10’ jute base pairs nicely with a 4’×6’ wool accent, while a 6’×9’ base works with a 3’×5’ patterned rug. This margin lets both pieces show, prevents the overlay from looking cramped, and gives you a natural “border” that frames the furniture.
Can I mix different materials safely?
Absolutely – mixing textures is what makes layered rugs feel cosy. Pair a low‑pile natural fibre base (jute, sisal or seagrass) with a plush wool or faux‑fur overlay for a tactile contrast. Just make sure the bottom rug is flat and non‑slip; that way the top piece stays put and you avoid tripping hazards. In homes with kids or pets, a synthetic blend on top adds stain‑resistance while the natural base provides durability.
How do I prevent slipping when layering?
The secret is a good rug pad. A felt pad with rubber backing under the base rug adds grip and a soft cushion, and it also protects hardwood from scratches. If you’re stacking two rugs, place a thin non‑slip pad between them as well – it keeps the overlay from sliding when you’re walking across the room. Check the pad’s size matches the base rug for an even surface.
How often should I clean layered rugs?
Regular upkeep keeps both rugs looking fresh. Vacuum the base rug first with a brush‑head to lift debris, then give the overlay a gentle shake outside before vacuuming on a low‑suction setting. Spot‑clean spills immediately, and rotate each rug every three to four months to even out wear. For wool overlays, a gentle wool‑safe shampoo once or twice a year does the trick, while synthetic tops can handle a low‑heat steam clean.
Is it okay to change the overlay seasonally?
Seasonal swaps are a great way to refresh the look without buying new bases. In summer, try a light linen runner or a pastel‑hued rug; in winter, a deeper, richer wool accent adds warmth. Because the base stays the same, you only need to store the seasonal piece in a breathable bag. Just remember to re‑align the edges with furniture legs each time you switch, so the layout feels intentional.
Conclusion
So, you’ve walked through the whole process of how to layer rugs in living room design, from picking a neutral base to adding a playful overlay and finishing touches.
The key takeaway? Keep the base larger, let the overlay speak in colour or pattern, and anchor everything with a non‑slip pad – that simple formula turns any floor into a curated statement.
If you’re a first‑time homeowner, picture the moment you step onto a soft wool overlay after a long day – that instant comfort is exactly why layering works.
In our experience, couples love swapping a seasonal runner in summer and bringing a richer wool piece in winter; the base stays put, so you only need to store one rug.
A quick checklist before you call it a day: check the size gap, align at least one edge with a furniture leg, add a thin pad between layers, and give both rugs a gentle vacuum.
Ready to try it yourself? Grab a rug you’ve been storing, lay it out, and let the room instantly feel more lived‑in. When you’ve nailed the look, you’ll wonder how you ever lived without layered rugs.
If you need help finding the perfect base or a luxe overlay, Harvey Bruce Interiors offers a curated selection that balances sustainability with style, making the whole layering journey effortless.
Bonus: Enhance Warmth with Wooden Plantation Shutters
So you’ve nailed the rug layering, but warmth still feels like a mystery in winter light. Sounds familiar, right? We’ll show you how. You want cozy underfoot and heat that stays in the room instead of escaping through the windows.
Wooden plantation shutters do more than look timeless. They add real insulation, help seal drafts, and let you fine tune daylight without blasting the heater. Sounds good?
The right wood tone matters. Rich oak or walnut brings warmth that echoes your textiles, while pale ash reads modern and bright when you want a lighter vibe.
Finish matters too. A satin glaze softens the look, while a matte stain hides fingerprints in a busy family room.
Slat orientation changes the feel. Tilt them to spill soft light across a rug, or close them tight for privacy and a cocooned mood.
In terms of energy, properly fitted shutters create a barrier that reduces heat loss through glass in winter and blocks sun in summer. That translates to lower fuel bills over the year. Sounds appealing, right?
Think of shutters as another layer in the design conversation. The wood tones can pull in the rug’s warmth, or contrast for a crisp, tailored edge.
If you’re layering rugs with a warm camel base and a bold patterned top, shutters in a similar wood tone unify the palette and prevent the room from feeling disjointed.
A quick practical plan: measure each window, note the sun’s path, and shortlist three finishes that match your rug colour. Ready to measure?
Consider a soft closing mechanism or motorized option to control light without heavy lifting. In our experience, even a simple upgrade makes afternoon light feel effortless.
Maintenance is straightforward: dust weekly, wipe with a damp cloth, and treat the wood with a gentle polish every few months.
So what should you do next? Measure your windows, browse timber options that echo your rug tones, and chat with Harvey Bruce Interiors about sourcing sustainable shutters that pair with layered textiles.
Why wooden plantation shutters work so well with rugs is simple: they bring texture and warmth from nature into the room. They act like a quiet chorus that supports the layering without shouting.
In spaces where sun hits a wool top rug, shutters soften the glare while preserving the rich fibre colour. In colder mornings, the wood’s heft makes the room feel grounded and inviting.
If you’re building a cohesive look, keep the shutter finish within two steps of your rug palette. A warm walnut pairs with camel tones; a lighter ash harmonizes with creams and soft grays.
Budget-wise, think of shutters as a long-term upgrade. The energy savings can compound year after year, especially in drafty rooms. It’s not just style; it’s practical stewardship of heat and resources. Done.
← Older Post Newer Post →
