Designing Plantation Shutters for Bay Windows: A Home Interior Guide
Posted by lamb27671@gmail.com on
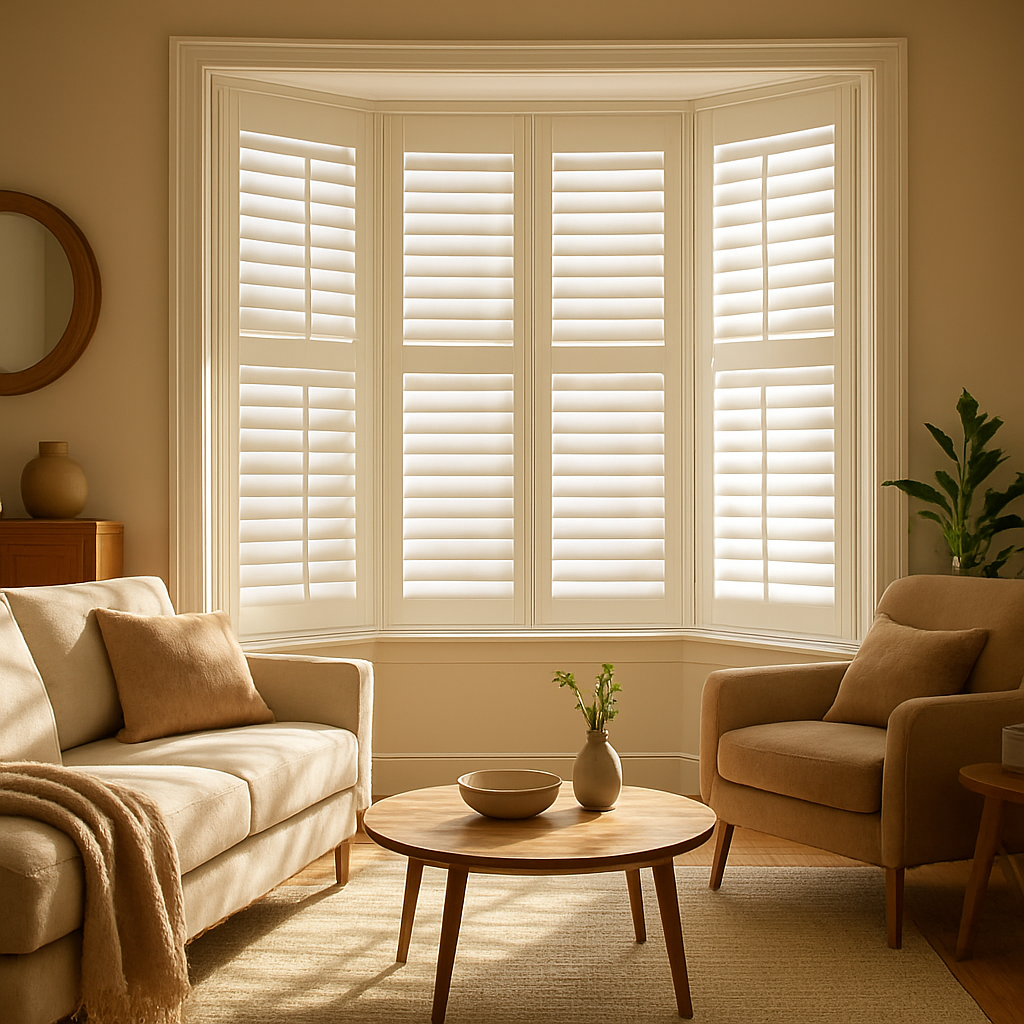
Picture this: you’re sipping tea by a sun‑lit bay window, and the light floods the room in a warm, angled glow. But the glare is a bit harsh, and you’re craving a bit more privacy without sacrificing that gorgeous view. That’s the exact moment many homeowners realize they need something that frames the window, controls light, and adds a touch of elegance – plantation shutters for bay windows.
Unlike standard blinds that can look flat on a curved surface, plantation shutters are built from sturdy, adjustable louvres that sit flush against the unique angles of a bay window. The result? You get the classic, crisp look of wooden shutters while still being able to tilt the slats to direct sunlight exactly where you want it.
Take Sarah, who renovated her seaside cottage last summer. She chose basswood shutters because the wood is lightweight, resists warping, and has a beautiful grain that complements her coastal palette. By installing tier‑on‑tier shutters on each plane of her bay window, she can open the lower panels for fresh sea breezes while keeping the upper sections closed for privacy during evenings.
Here’s a quick checklist to make sure you get the most out of your bay window shutters:
- Measure each window plane separately – angles matter.
- Choose a material that matches your interior style; basswood offers a warm, natural feel.
- Decide between full‑height and tier‑on‑tier configurations – the latter gives you independent control over each section.
- Consider custom paint or stain finishes to tie the shutters to existing furniture.
And don’t forget about the installation process. A professional team will ensure the hinges align perfectly across the three panes, preventing any wobble when you open or close the slats. It’s a small detail, but it makes a huge difference in the overall feel of the room.
When you’re ready to explore options, check out Premium Basswood Wooden Shutters for Quality Interiors. Their range is designed to fit the quirkiest bay window angles while delivering that high‑end, bespoke look you’ve been dreaming of.
So, whether you’re after a subtle backdrop for your reading nook or a bold statement piece that anchors the room, plantation shutters for bay windows can transform the space. Let’s dive deeper into the design choices and practical tips that will help you pick the perfect set for your home.
TL;DR
If you’ve ever stared at a sun‑lit bay window wondering how to tame glare while keeping that breathtaking view, plantation shutters for bay windows give you sleek, adjustable control and a touch of timeless elegance.
Choose the right material, measure each plane, and let a pro install the hinges so you enjoy effortless light‑filtering, privacy, and style that transforms your home.
Understanding Bay Window Architecture and Shutter Fit
When you first glance at a bay window, you might think “just another window,” but there’s actually a little geometry lesson hiding in those three angled panes. The way each plane meets the wall, the pitch of the roof, and even the surrounding moulding all dictate how a shutter will sit.
Think about the moment you’re trying to line up a picture frame on a wall that isn’t quite square – you end up adjusting, nudging, and maybe even cutting a piece to fit. That’s exactly what happens with plantation shutters for bay windows. Each leaf has to be measured and cut to match the exact angle of its plane, otherwise you’ll get gaps, wobble, or a look that feels “off.”
Why the Angle Matters
Most standard shutters are designed for flat, rectangular openings. A bay window, however, typically consists of a central picture window flanked by two angled side windows, often at 30° or 45°. Those angles change the width of each shutter leaf, and they also affect how the hinge pivots.
If the hinge sits too far from the corner, the leaf will swing out into the room rather than hug the wall. That’s why a professional will often use custom‑fabricated hinges that follow the curve of the bay – a detail you’ll notice only when the shutters close silently without a single squeak.
Measuring Each Plane Separately
Here’s a quick mental checklist:
- Measure the height from the sill to the top rail on each plane.
- Record the width at the top and bottom – they’ll differ because of the angle.
- Note the angle itself; a pro can use a digital protractor or a simple carpenter’s square.
Once you have those numbers, the shutter manufacturer can calculate the exact leaf dimensions. It’s a bit like tailoring a suit – you need those precise measurements before the fabric is cut.
And if you’ve ever dealt with storm‑damaged windows, you know why a perfect fit is non‑negotiable. A badly fitted shutter can let drafts in, which defeats the whole purpose of adding that extra layer of insulation. That’s where resources like the step‑by‑step guide for emergency board‑up after storm damage become surprisingly handy – they stress the importance of sealing every edge, something your shutters will help you achieve.
Material Choices and Their Impact on Fit
Choosing basswood, oak, or MDF isn’t just about looks; each material behaves differently when you cut it to an angle. Basswood, for example, holds its shape well and resists warping, which is crucial when you have a leaf that’s wider at the top than at the bottom.
Some homeowners love the warm grain of basswood, while others prefer the sleek uniformity of painted MDF. The key is to pick a material that won’t expand or contract dramatically with humidity – otherwise you’ll end up with a gap that looks like a smiley face in your wall.
Speaking of design inspiration, I often browse Midnight Scriber’s creative blog for unexpected colour pairings and texture ideas. One recent post showed how a deep charcoal shutter paired with a light‑washed plaster wall can make the bay window become the room’s focal point without shouting.
Installation Nuances
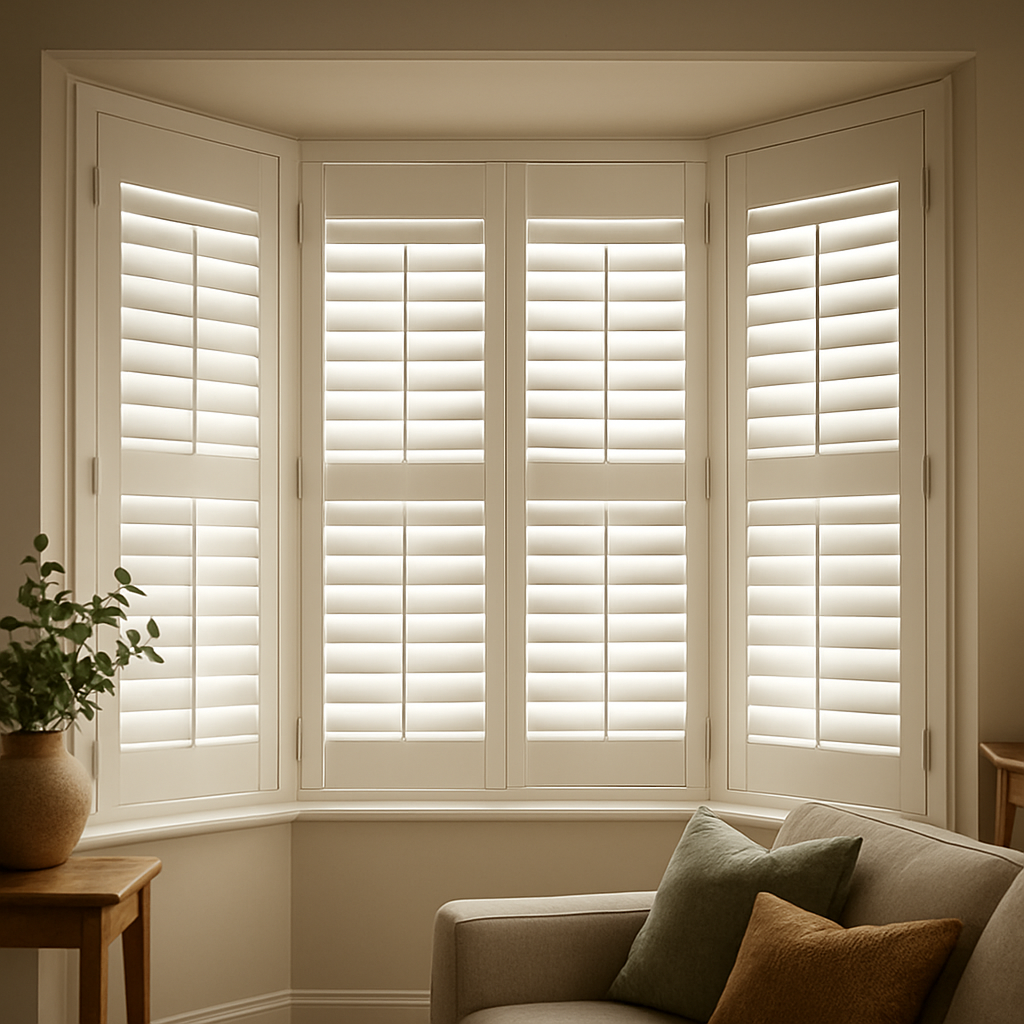
The installer will first attach a mounting board that follows the exact contour of each pane. Then the custom hinges are bolted onto that board, ensuring the leaf sits flush. It’s a subtle step, but if the board is even a millimetre off, the whole system can feel loose.
After the shutters are hung, you’ll notice the slats tilt evenly across all three planes. That’s the sweet spot – you can dim the morning sun on the side panes while keeping the central view bright. It’s the kind of control that makes you wonder how you ever lived without it.
Here's a quick visual walkthrough that shows the hinge alignment in real time.
Now that you’ve seen the mechanics in action, let’s talk about the aesthetic side. The colour of the shutters should complement the surrounding trim, not clash. If your bay window has classic white cornice moulding, a soft cream or pastel finish can blend seamlessly. For modern interiors with black metal frames, a deep espresso or matte black shutter adds drama.
And if you’re hunting for a specific style guide, the online guide on selecting and installing a kaminofen surprisingly covers how to match hardware finishes across different home features – a useful tip when you want your shutter handles to echo the metal of a fireplace.
Picture the finished result in your living room.
Bottom line: understanding the geometry of your bay window is the first step to a flawless shutter fit. Measure each plane, choose a stable material, and trust a pro installer to respect those angles. When everything aligns, you’ll get a window that feels tailor‑made, controls light like a pro, and adds that polished, timeless vibe you’ve been chasing.
Material Choices and Styles for Plantation Shutters
When you stand in front of a bay window, the first thing you notice is how the angles demand a personality of their own. The material you pick for your plantation shutters will either whisper or shout that personality.
Wood: The Classic Warmth
Wood feels like a hug – especially basswood, pine, or hardwoods that match other furniture. It can be stained to echo a walnut table or painted bold to become a statement piece. Because wood accepts paint and stain so well, you can tie it back to your sofa, crown moulding, or even the floorboards.
One thing to watch: wood expands and contracts with humidity. In a breezy bay, make sure the shutters are sealed and finished properly – a quick sand‑and‑seal from a pro keeps warping at bay.
Polymer: Light‑Weight, Low‑Maintenance
Polymer shutters are essentially high‑density PVC. They’re lighter than wood, resist moisture, and, as Louvershop notes, they can be up to 30% more insulating than a wooden counterpart. That makes them a smart pick for sun‑soaked rooms or even a coastal cottage where salty air tries to sneak in.
Because they’re paint‑ready, you can still get a custom colour without worrying about water damage.
Hybrid: Best of Both Worlds
Hybrid shutters blend a thin wood core with a polymer skin. The result is a slimmer profile for shallow windows (common in older bay windows) while still offering the warmth of wood and the durability of polymer. Think of it as a “designer‑fit” for those tight‑space moments.
And yes, you can still customize the louver size – wider slats give a contemporary feel, narrower slats stay true to a traditional look.
Style Choices That Matter
Louvers come in a range of widths. Four‑and‑a‑half inch slats read modern and airy; 2‑inch slats feel more classic. If you love a clean line, go for a hidden tilt rod – the “no‑rod” look hides the mechanism and lets the louvre itself become the star.
Full‑height shutters wrap the entire pane, perfect for a seamless look. Tier‑on‑tier splits the panel horizontally, letting you lower the bottom half for a breeze while keeping the top closed for privacy. It’s the same trick Sarah used in her seaside cottage.
Do you prefer a painted finish that blends into the wall, or a stained wood that stands out? The answer often hinges on the room’s colour palette. Light paint can make a small bay feel larger; dark stain adds drama to a grand living area.
Quick Decision Table
| Material | Best Use | Key Benefit |
|---|---|---|
| Wood (Basswood, Oak, Pine) | Traditional or transitional interiors | Paint & stain versatility; natural warmth |
| Polymer (PVC) | Moisture‑prone rooms, coastal homes | High insulation, low maintenance |
| Hybrid (Wood core + Polymer skin) | Shallow bay windows, modern homes | Slim profile + durability |
So, which material feels right for your bay? If you love the classic look and don’t mind a bit of upkeep, wood is your go‑to. If you need something that laughs at humidity and still looks sleek, polymer wins. And if you’re stuck between space constraints and style, hybrid is the happy medium.
Take a moment to hold a sample board against your window. See how the colour shifts with the afternoon sun. Imagine the louvre angle you’ll love for that morning coffee. When you’ve nailed the feel, let a Harvey Bruce specialist cut it to the exact angles of your bay – because a perfect fit turns a window into a work of art.
Measuring and Installing Plantation Shutters on Bay Windows
Okay, you’ve picked the material, you love the look, and now the real work begins – getting those plantation shutters to hug each angle of your bay just right. It feels a bit like tailoring a suit, doesn’t it? One wrong stitch and the whole thing looks off.
Step 1: Gather Your Tools (and a Little Patience)
Before you even touch the glass, pull out a steel tape, a digital angle finder, a pencil, and a sturdy notebook. Trust me, a notebook beats trying to remember “that weird 12‑degree tilt” later on.
Pro tip: many installers swear by a laser measurer for the depth, but a good old‑fashioned steel tape works just fine if you keep it straight.
Step 2: Measure Each Plane Separately
Bay windows are usually three panes – a center and two side planes. Start with the center pane: measure the width from inside edge of the frame to the outer edge of the glass, then do the same for height. Write it down.
Next, move to the left pane. Because the angle is different, you’ll need to note the angle itself – most DIYers use a digital protractor and get something like 30° or 35°.
Repeat for the right pane. If the angles aren’t identical (they often aren’t in older homes), treat them as separate projects.
Step 3: Add Clearances
Here’s where the magic happens: you want a tiny gap – about 1/8 inch – between the shutter and the frame. That little breathing room prevents the wood or polymer from rubbing and warping when humidity shifts.
So, add 0.125" to each width and height measurement. If you’re working with a deep bay (say, 12" deep), you might need to add a bit more to accommodate the hinge plate thickness.
Step 4: Create a Mock‑up Template
Cut a piece of cardboard to the exact dimensions you just calculated. Tape it over each pane and step back. Does it sit flush? Any gaps? This cheap test saves you a costly redo.
One of our clients in Brighton did this with a 3‑plane bay that had a 28° side angle. The cardboard mock‑up revealed a 2‑mm mis‑alignment on the right side – a simple tweak before the shutters left the workshop.
Step 5: Choose the Shutter Style
Full‑height shutters give a seamless look, but tier‑on‑tier offers that breezy bottom half you love for morning air. If you’re unsure, order a single full‑height panel as a sample; you can always add a tier‑on‑tier kit later.
Remember, the louvre width matters too. Wider slats (4½") feel modern, while narrower (2") keep a classic vibe.
Step 6: Order to Exact Angles
Send your measurements, angle data, and style choice to a reputable maker – Harvey Bruce’s specialists are used to cutting at odd angles without a fuss. They’ll mill the hinge line so that each plane’s hinge sits at the same depth, eliminating wobble.
If you’re ordering polymer or hybrid shutters, ask for a UV‑resistant finish – it’s a tiny extra cost that pays off in a sunny bay.
Step 7: Installation Day – Prep the Wall
Clear the area, lay down a drop cloth, and locate the studs behind the frame. Most bay windows have a solid backing; if not, use wall anchors rated for the shutter weight (usually 2‑3 kg per panel).
Mark the hinge line on the wall with a pencil, making sure it’s level across all three panes. A level with a magnetic base helps keep the line straight.
Step 8: Mount the Hinges
Secure the hinge plates first – they’re the foundation. Then hang the shutter panels onto the hinges, starting with the center pane. Check for even gaps, then attach the side panes.
Give each panel a gentle wiggle. If you feel any drag, loosen the screw by a fraction and retighten. The goal is a smooth, silent swing.
Step 9: Final Adjustments and Finishing Touches
Adjust the tilt rods (or hidden tilt mechanism) so the louvres sit parallel when closed. Test the full range – from fully open for a sunrise view to fully closed for privacy.
Finally, caulk any tiny gaps with a paint‑matched silicone sealant. It keeps drafts out and gives a polished look.
And there you have it – a set of plantation shutters that not only frames your bay but also becomes part of the room’s character.
Need a visual refresher? This installation walkthrough video walks through the same steps with a real‑world example.
Ready to start measuring? Grab that tape, jot down those angles, and let’s turn your bay into a showcase of light and style.
Maintaining and Enhancing the Look of Your Shutters
You’ve just installed your plantation shutters for bay windows and they already look like a custom‑made masterpiece. But, just like a favorite armchair, they’ll stay gorgeous only if you treat them right.
So, what does “treat them right” actually mean? It’s a mix of quick‑daily habits, a seasonal check‑up, and a few smart material choices that keep the wood or polymer smiling through sunshine and salty breezes.
1. Light‑touch cleaning, big‑impact results
First thing’s first: dust off the louvers with a soft microfiber cloth or a duster that can slip between the slats. Do this once a week – it prevents buildup that can turn into gritty scratches.
If you live near the coast, a gentle wipe‑down with a damp cloth every two weeks helps whisk away that sneaky salt residue. For a deeper clean, mix a few drops of mild dish soap with warm water, dip a soft brush into the solution, and scrub the hinges and louver crevices. Rinse with a clean damp cloth and dry immediately; you don’t want any water soaking into the wood.
2. Guarding against coastal wear and tear
Salt‑laden air and UV rays love to attack shutters. That’s why choosing marine‑grade stainless‑steel hinges and screws is a game‑changer – they resist rust and keep the swing smooth for years.
According to AAA Blind & Shutter Factory, regular inspections and using rust‑resistant hardware can extend a shutter’s life dramatically, especially in seaside homes. Set a reminder to check each hinge for signs of corrosion every spring and summer.
Apply a UV‑resistant finish or a clear marine‑grade sealer to wood shutters every 3‑4 years. The extra coat acts like sunscreen, preserving colour and preventing the grain from drying out or warping.
3. Hardware health check
Loose screws are the silent killers of smooth operation. Grab a small screwdriver and give every screw a gentle tighten after each cleaning session. If a screw spins without catching, replace it with a stainless‑steel match.
Stiff tilt rods? A few drops of silicone‑based lubricant on the pivot points will coax them back to buttery smoothness. Just wipe away any excess so you don’t attract dust.
4. Refreshing the finish
Even the best‑crafted shutters can look a little tired after a few seasons. For painted shutters, a fresh coat of low‑VOC, paint‑matched enamel can revive the look without the strong odour of traditional paints. For natural wood, a thin layer of high‑quality Danish oil or a water‑based polyurethane will deepen the grain and add a protective shield.
Before you brush, test the colour on a hidden louver – lighting can shift the hue dramatically, and you want the final result to feel just right in the room’s natural light.
5. Seasonal check‑up checklist
Mark your calendar for a quick 15‑minute audit each season:
- Inspect each hinge for rust or loosening.
- Wipe down louvers and clean any salt buildup.
- Test the tilt mechanism – it should glide without hesitation.
- Look for cracks, warping, or discoloration in the wood.
- Re‑apply sealant or finish if the surface looks dull.
These tiny steps add up to years of flawless performance and keep your shutters looking showroom‑ready.
And there you have it – a simple, human‑centric routine that turns maintenance into a quick coffee‑break activity rather than a chore. Your plantation shutters for bay windows will keep framing that gorgeous view, controlling light, and adding that luxe touch you fell in love with, day after day.
Cost Comparison and Value Assessment for Plantation Shutters
When you start looking at the price tag on plantation shutters for bay windows, the first thing you notice is that the numbers can feel a bit intimidating. That’s normal – a bay window isn’t just a single pane, it’s three pieces that each need their own custom panel.
On average, homeowners spend about $800 to cover a typical three‑panel bay window, according to Angi's cost guide. That figure includes material, labor, and the little extras like custom hinges that keep everything moving smoothly.
But the story doesn’t stop at the upfront cost. Plantation shutters tend to deliver a solid return on investment – roughly 75% in resale value, a number you’ll see echoed by other industry experts Bloomin' Blinds notes. In plain English, that means if you spend $5,000 on a set, you could recoup about $3,750 when you sell your home.
What drives the price?
Material is the biggest lever. Hardwood shutters sit in the $250‑$600 range per window, while faux‑wood options drop to $150‑$400. PVC or vinyl versions can be as low as $75‑$300, but they also come with a different feel and durability profile.
Labor is another chunk of the budget. Most contractors charge $20‑$45 per square foot, and the deeper the bay (think 12‑inch depth) the more you’ll pay for the hinge plates and extra clearance.
And then there are the add‑ons: cordless operation, motorization, or decorative cloth tape can each add $100‑$300 per window.
Value beyond dollars
Beyond the numbers, plantation shutters give you energy savings that show up on your utility bill. Wood and faux‑wood provide good insulation, but PVC shutters are especially efficient, cutting heat loss by up to 30% in some cases. That translates to lower heating costs in winter and a cooler home in summer – a hidden payoff that adds years of savings.
They also protect your interior from harsh UV rays, which helps preserve furniture, flooring, and artwork. In coastal or humid climates, choosing a moisture‑resistant material (faux‑wood or PVC) prevents warping and extends the life of the shutters well beyond the typical 20‑year mark.
Finally, there’s the aesthetic premium. A well‑fitted set frames your view, adds a sense of craftsmanship, and can become a focal point in any room – something you can’t quantify, but it certainly influences how buyers feel about your home.
Quick cost‑vs‑benefit snapshot
| Material | Avg Cost per Window (US$) | Typical ROI |
|---|---|---|
| Hardwood (basswood, oak) | 250‑600 | ~75% |
| Faux‑wood (composite) | 150‑400 | ~75% |
| PVC / Vinyl | 75‑300 | ~70‑75% |
So, how do you decide what’s worth it for your bay window?
Start by measuring the total square footage of the three panels. Multiply that by the contractor’s per‑square‑foot rate to get a baseline labor cost. Then add the material price that matches your climate and style preference.
Next, factor in the long‑term savings – energy efficiency, reduced maintenance, and the resale boost. If the total adds up to less than the projected ROI, you’re looking at a smart investment.
And remember, buying in bulk – say, outfitting all the windows in your home at once – often unlocks wholesale pricing that can shave a few hundred dollars off each set.
Bottom line: plantation shutters for bay windows may feel pricey at first glance, but when you stack material, labor, energy savings, and resale impact together, they often pay for themselves faster than you’d expect.
FAQ
What are plantation shutters for bay windows and why choose them?
Plantation shutters for bay windows are custom‑fitted panels that wrap each angled pane of a bay. Because they’re built from adjustable louvres, you can tilt them to let in just the right amount of light while still keeping a clear view. The biggest win is that they seal the corners, so you cut drafts, boost insulation, and add a sleek, timeless look that instantly upgrades the room’s style.
How do I measure my bay window for plantation shutters?
Start by measuring each of the three panes separately – width from the inside edge of the frame to the outer glass, and height the same way. Grab a digital angle finder and note the tilt between the center and each side pane; most bays sit between 25° and 35°. Add a 1/8‑inch gap to every dimension so the shutter can breathe, then cut a cardboard template to double‑check the fit before you order. This step saves you a costly redo.
What material should I pick for my bay window shutters?
If you love the warmth of natural grain and don’t mind a little seasonal upkeep, solid wood – especially basswood or oak – gives you that classic, handcrafted feel and can be stained to match any furniture. For coastal or high‑humidity rooms, polymer (PVC) resists moisture, stays light, and often offers better insulation, so it won’t warp. Hybrid shutters blend a thin wood core with a polymer skin, giving a slimmer profile for shallow bays while keeping the wood’s visual appeal. Choose the one that fits your climate, style, and budget.
Can I install plantation shutters on a bay window myself?
You can certainly tackle the basic measuring and template work on your own, but the hinge line that runs across three angled panes is the trickiest part. If the hinges aren’t milled to the exact depth, you’ll end up with wobble and gaps. Most homeowners find it worth hiring a specialist to cut and install the hinges, then finish the finish themselves. In short, DIY is doable for the prep, but trust a pro for the final fit to avoid costly adjustments later.
How do plantation shutters improve energy efficiency in a bay window?
The solid panels seal the gaps between each angled frame, so warm air in winter and cool air in summer stay where they belong. The louvres act like a secondary barrier; when you tilt them closed they block drafts while still letting diffused light in. In a typical three‑pane bay, homeowners report up to a 20‑30% reduction in heating or cooling bills after installing well‑fitted shutters.
What maintenance does a set of plantation shutters for bay windows need?
Treat them like a favourite piece of furniture – dust the slats weekly with a soft cloth, and give the hinges a quick tighten every few months. In salty coastal air, wipe the frames with a damp microfiber and follow up with a marine‑grade silicone sealant every 3‑4 years to keep moisture out. If you chose wood, a light coat of Danish oil or water‑based polyurethane once a year will keep the grain looking rich and protect against warping.
Conclusion
Let’s take a breath and look back at what we’ve covered. You’ve seen how plantation shutters for bay windows hug every angle, keep the glare in check, and add that timeless charm you’ve been dreaming of.
The biggest win? A perfect fit. Measuring each pane, choosing the right material—whether warm basswood or low‑maintenance polymer—and trusting a pro to mill the hinge line turns a tricky bay into a seamless frame.
Beyond looks, those shutters become silent energy allies. They seal drafts, let you tilt the louvres for diffused light, and, with a quick dust‑off and occasional hinge tighten, they stay fresh for years.
When you partner with Harvey Bruce, you get more than a product. You get bespoke craftsmanship, sustainable sourcing, and a team that walks you through every step—from sample board to final install—so the process feels as easy as sipping tea by the window.
So, what’s the next move? Grab a tape measure, jot down each plane’s width and angle, and schedule a quick design consult. A simple sketch today can become the centerpiece of tomorrow’s living room.
Ready to transform your bay? Reach out now and let us bring your vision to life, one perfectly angled shutter at a time.
← Older Post Newer Post →
