How to Decorate Shelves in Living Room: A Step‑by‑Step Guide
Posted by Harvey Bruce on
Ever walked into a living room and felt that something was missing, even though the sofa and coffee table looked perfect?
Maybe the empty wall space above the TV or the bare shelves by the window are whispering for a little love.
If you’ve ever wondered how to decorate shelves in living room without turning the space into a cluttered showcase, you’re not alone.
We get it – you want a look that feels luxurious, personal, and still functional, especially when you’re a homeowner craving that high‑end vibe without the hassle.
In this guide we’ll walk through a handful of tried‑and‑true ideas that we’ve seen work for our clients, from mixing textures to playing with height, all while keeping the overall feel effortless.
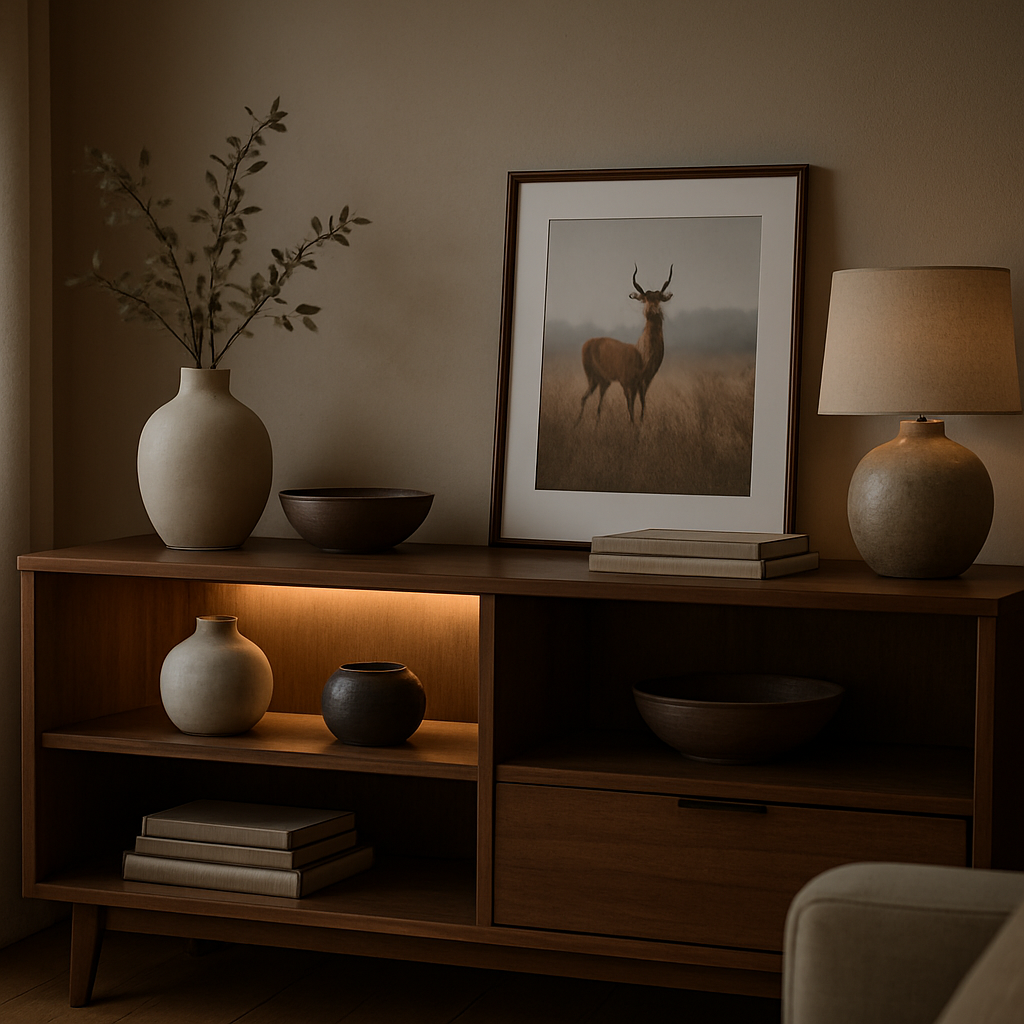
First, think of each shelf as a mini canvas. Start with a grounding piece – a sleek contemporary media storage unit or a sleek wooden cabinet that anchors the eye.
Then layer on accessories that tell a story: a sculptural vase, a stack of your favourite design books, a few curated ornaments, maybe a stylish wall clock that doubles as art.
Don’t be afraid of negative space; a couple of carefully placed objects can make the whole arrangement feel breathing, not boxed‑in.
Colour plays a subtle role too. A pop of muted green from a plant or a soft gold accent can lift the mood without shouting.
And because you’re probably juggling a busy life, we’ll also share quick styling tricks that take under ten minutes, so the shelves stay fresh without a full‑on redesign each season.
By the end of this article you’ll have a clear roadmap for turning those bare ledges into conversation starters that reflect your personal style and the timeless elegance Harvey Bruce is known for.
Enjoy the transformation.
TL;DR
If you’re craving a luxe, uncluttered look, learn how to decorate shelves in living room with simple layering, texture mixing, and mindful spacing that feels effortlessly curated.
We’ll show quick, under-ten-minute tricks—choose a grounding media storage piece, add a pop of green or gold, and swap accessories seasonally for fresh impact.
Step 1: Assess Your Space
First thing’s first – take a step back and actually look at the shelves you’re about to style. Maybe you’re standing in front of a sleek media console and thinking, “What on earth do I put here without it looking like a cluttered junk drawer?” You’re not alone. The feeling of staring at an empty ledge and wondering where to start is exactly why we begin with a solid assessment.
Ask yourself: how many objects do you really need on display versus what can live elsewhere? A quick mental sweep of the room helps you decide whether the shelves will act as a showcase, a functional storage spot, or a little bit of both. In our experience, the best shelf stories start with a clear purpose.
Grab a tape measure or, if you’re feeling lazy, just use your phone’s ruler app. Measure the width, depth, and height of each shelf segment. Knowing the exact dimensions lets you pick items that fit without forcing, and it prevents the dreaded “it looks crowded” vibe later on. Write those numbers down – it’s surprisingly satisfying to see the numbers line up with the pieces you already love.
Next, take note of the lighting in the room. Natural light changes throughout the day, and artificial fixtures can either highlight or hide your décor. If the shelves sit under a large window, you’ll want to balance bright sunlight with something that won’t glare. If the space is dim, think about adding a subtle LED strip or a small lamp to give each object its own spotlight. A well‑lit shelf feels curated, while a dark one feels neglected.
Here’s a quick visual guide that walks you through measuring and lighting basics:
After you’ve got the numbers and light plan sorted, think about the shelf’s focal point. What piece will draw the eye first? It could be a sculptural vase, a stack of design books, or a bold artwork. Position that item at eye level or slightly above – that’s the visual anchor that other pieces will orbit around.
If you’re hunting for that anchor, you’ll love the range of modern media storage furniture we stock. A sleek media unit not only grounds the room but also offers hidden compartments for those “just‑in‑case” items you don’t want on display.
Now, a word about lighting that goes beyond the shelf itself. Partnering with a specialist can make a huge difference. LED Artistry lighting services provide custom fixtures that highlight your décor without harsh glare – perfect for those evenings when you want the shelves to glow gently.
And don’t forget the art. A small framed wildlife print can add a splash of colour and a touch of nature without overwhelming the composition. Check out contemporary wildlife art prints for ideas that pair beautifully with neutral tones.
Finally, write down a quick “shelf cheat sheet.” List the three‑to‑five items you’ll keep on each level, note their heights, and mark any lighting fixtures you’ll add. When you walk away with that cheat sheet, you’ve turned a vague idea into a concrete plan – and the rest of the guide will flow from there.
Step 2: Choose a Theme & Colour Palette
Now that you’ve measured every nook, it’s time to give those shelves a personality. Think of the colour palette as the soundtrack to a film – it sets the mood before any object even appears.
First, ask yourself what you want the room to feel like when you walk in. Cozy and intimate? Fresh and airy? A splash of drama? The answer will steer your hue choices and the style of accessories you’ll pull from the shelf.
1. Start with a mood board (or a mental sketch)
Grab a few magazine cut‑outs, a Pinterest board, or simply a piece of scrap paper. Jot down colours you’re already living with – the sofa fabric, the rug, the curtains. Those existing tones become your anchor.
Tip: If your living room already leans towards deep olive or a warm plum, you’re already on the 2026 trend track. Designers are favouring saturated, earthy hues to create that cocooning vibe 2026 living‑room colour trends.
2. Choose a base colour and a complementary accent
Pick one “base” colour for the larger items on the shelves – think of a matte ceramic vase or a wooden box. Then select an accent colour that pops against it. A soft gold handle on a deep‑green bowl, for instance, adds visual intrigue without shouting.
We often see homeowners pair a muted, nature‑inspired tone with a metallic finish – it feels luxurious yet grounded.
3. Apply the palette to your shelf layers
Start with the biggest piece – maybe a sculptural wooden cabinet or a sleek black multi‑shelf unit. Keep it in the base colour. Then, layer mid‑size items (books, decorative trays) in neutral tones – off‑white, stone, or pale timber.
Finally, sprinkle the accent colour in the smallest accessories: a teal‑blue ceramic jar, a blush‑pink scented candle, or a patterned scarf folded artfully. The trick is to keep the accent limited to 10‑15% of the visual weight so it feels like a whisper rather than a shout.
Does this feel overwhelming? Take a step back after each layer and ask, “Does this still feel balanced, or am I crowding the shelf?”
4. Test with lighting before you commit
Lighting can shift colour perception dramatically. Warm LED strips make golds glow, while cooler daylight bulbs highlight blues. Turn the lights on, step back, and watch how the palette morphs. If something feels off, swap a piece or adjust the hue slightly.
Remember, you can always swap out a small accent later – it’s the easiest way to refresh the look without a full redesign.
So, what’s the next move?
Watching that quick video can help you visualise how colour swatches look side‑by‑side on a shelf. Pause, note the combos you love, then head back to your board.
5. Keep a quick reference checklist
- Base colour chosen (e.g., deep olive)
- Accent colour limited to ~10% (e.g., brass, teal)
- Three‑tier layering: large base, medium neutrals, small accents
- Lighting tested (warm vs cool)
- One‑sentence mood check: does it feel cozy, fresh, or bold?
When you’re happy with the palette, you’ll notice the shelves start to feel like an extension of the room rather than a separate display. The colour story you create here will echo through cushions, throws, and even the artwork you’ll add later.
If you need more inspiration on how to weave a theme through your shelves, Martha Stewart offers a solid walk‑through of creating cohesive shelf stories that feel intentional style living‑room shelves. It’s a great reminder that a theme isn’t just a colour – it’s the vibe you repeat in textures, materials, and the way you arrange them.
Take a breath, look at your board, and let those colours guide each placement. Before you know it, those once‑blank ledges will be speaking the same visual language as the rest of your living room, and you’ll have nailed how to decorate shelves in living room with confidence.
Step 3: Select Shelving Styles & Materials
Okay, you’ve nailed the colour story – now it’s time to decide what the shelves themselves will look like. The style you choose can either whisper elegance or shout personality, and the material decides how long that whisper lasts.
Do you picture a sleek floating shelf that seems to disappear into the wall, or a robust wooden cabinet that feels like a piece of furniture in its own right? The answer usually lies in how you use the space and what vibe you want for your living room.
Floating vs. Built‑In: the quick test
Floating shelves are perfect for a light, airy feel. Because they sit on hidden brackets, they keep the floor clear and let the wall do the heavy lifting. If your room is on the smaller side, or you love a minimalist aesthetic, this is the go‑to choice.
Built‑in or cabinet‑style shelves, on the other hand, add a sense of permanence. They become a statement piece, especially when you choose a rich wood finish or a brushed metal frame. They’re also a natural home for heavier items like a tall vase or a stack of design books.
So, which one feels right for you? Ask yourself: Do I want the shelves to blend into the background or to be a focal point?
Materials that matter
Wood is still king in 2026. Solid hardwoods like acacia, mango or sheesham not only look gorgeous, they last years longer than MDF. The woodensure blog points out that solid wood shelves can boost perceived home value by up to 12% according to recent market research. If sustainability is a priority, look for FSC‑certified options – they’re good for the planet and for your peace of mind.
Metal frames add an industrial edge and can support more weight. A hybrid metal‑and‑wood shelf gives you the best of both worlds: the warmth of timber plus the strength of steel. According to the same source, metal‑wood combos improve load capacity by about 35%.
For a splash of drama, epoxy‑resin inlays are trending. A resin river running through a live‑edge slab makes the shelf a piece of art. It’s a bit more pricey, but it instantly elevates a living‑room shelf to a conversation starter.
Match style to room function
Think about what will live on each shelf. Large decorative objects – think a sculptural vase or a statement clock – need a sturdy base. Mid‑size books or trays look great on a floating wood shelf with a subtle grain. Tiny accents – a teal ceramic jar or a gold‑finished candle – can be perched on a metal‑accented ledge for a pop.
And don’t forget lighting. A concealed LED strip behind a floating shelf creates a soft halo that makes any material glow, while a small wall‑sconce above a cabinet can highlight a wood grain texture.
Here’s a quick cheat‑sheet to help you decide:
| Style | Material | Best Use |
|---|---|---|
| Floating shelf | Solid hardwood (acacia, mango) | Light décor, small plants, minimal‑ist look |
| Cabinet‑style shelf | Wood with metal brackets | Heavier items, books, statement pieces |
| Live‑edge resin shelf | Wood + epoxy resin | Artistic focal point, luxury vibe |
Notice how each row pairs a visual style with a material that supports its purpose? That’s the kind of decision‑making that keeps your shelf from feeling like a random grab‑bag.
In our experience, homeowners who combine one floating shelf with a single built‑in unit get the best of both worlds – the floating piece adds visual lightness, while the cabinet anchors the look.
Finally, give yourself a minute to picture the finished scene. Close your eyes, imagine the lighting you love, and ask: does the material feel right to touch? If you can answer “yes,” you’ve probably found the perfect match.
Now that you know how to pick a style and material, the next step is all about arranging the objects you’ve already curated. Ready to layer like a pro?
Step 4: Arrange Décor Items Creatively
Now that you’ve settled on a style and material, the real fun begins – figuring out how to arrange the décor items so the shelf feels intentional, not accidental.
First, pull all the pieces you’ve curated onto the floor. Seeing everything together helps you spot the hero object – maybe a sculptural vase or a sleek metal clock – and decide which side of the shelf should get the spotlight.
A reliable trick is the 3‑zone rule we mentioned earlier: base, middle, top. Start by placing your largest item in the base zone, anchored against the back or side of the shelf. This creates visual weight and prevents the rest of the composition from wobbling.
Next, fill the middle zone with mid‑size items – a stack of design books, a tray of candles, or a small plant. Keep the spacing loose; a 2‑3 cm gap between objects lets each piece breathe and adds that curated vibe we all love.
Finally, sprinkle the top zone with accents that draw the eye upward – a delicate sculpture, a pair of metallic knobs, or a single statement frame. Because we’re dealing with a living‑room shelf, you want the eye to travel from floor to ceiling, so the highest items should be the lightest visually.
So, how do you avoid a chaotic jumble? The answer lies in stepping back every few minutes and asking yourself, ‘Does this still feel balanced?’ If one side looks heavier, swap an object to the opposite side or introduce a negative‑space gap.
Texture mixing is another secret weapon. Pair a smooth ceramic jar with a rough‑hewn wooden box, or a glossy metal bowl with a soft woven basket. The contrast creates depth without adding more objects. Our luxury wooden cabinets often showcase this play, letting the wood’s grain converse with polished accents.
Colour coordination doesn’t mean everything has to match. Choose a dominant hue – say, deep navy from a vase – and repeat it in smaller doses, like a navy‑blue book spine or a tiny copper‑tone coaster. This repetition ties the whole arrangement together while still allowing each item its moment.
Lighting can make or break the final look. A concealed LED strip behind a floating shelf adds a subtle halo, while a small directional lamp can highlight a decorative object at the top corner. If you’re using a cabinet‑style shelf, consider a built‑in LED strip that follows the shelf’s silhouette – it adds drama without shouting.
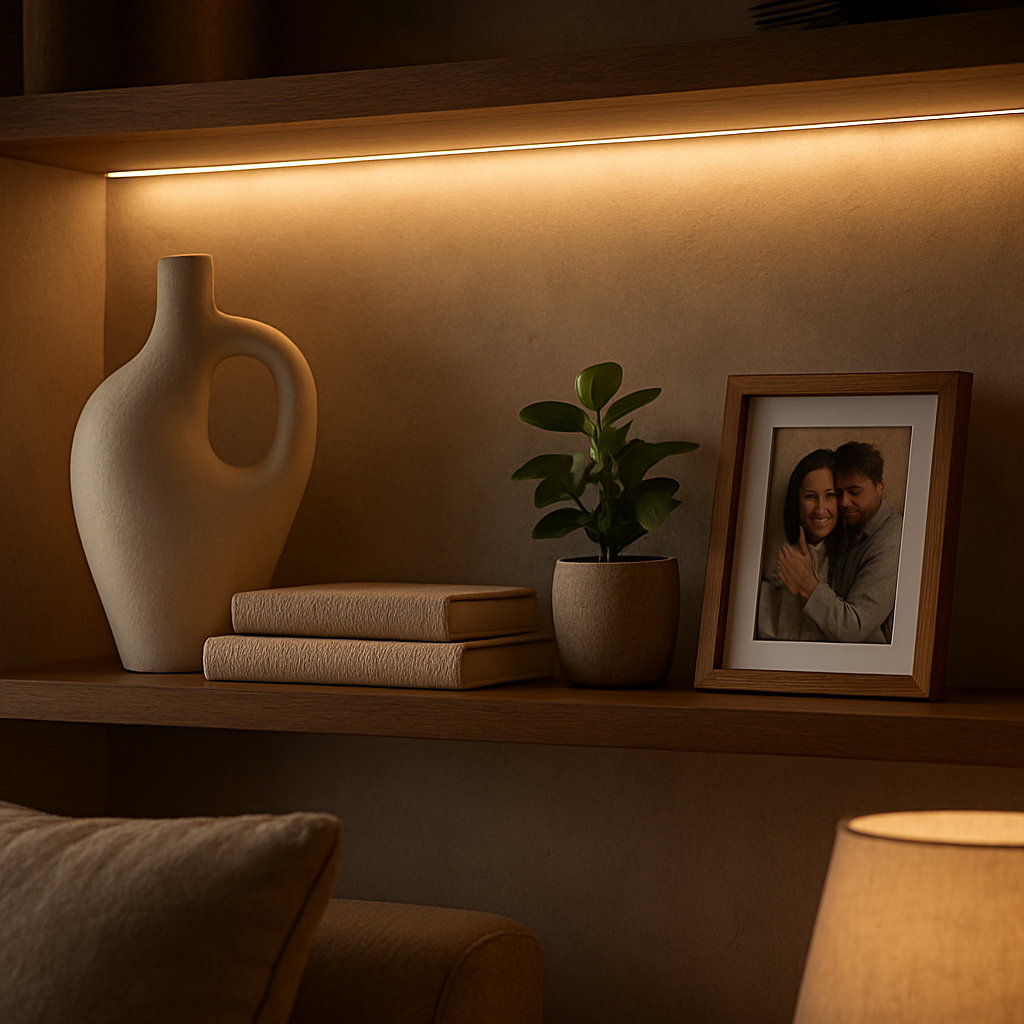
Don’t forget personal touches. A framed photograph from your recent holiday, a handcrafted ceramic you picked up on a market trip, or a small heirloom piece adds story. When a visitor asks ‘What’s that?’ you get to share a slice of your life, turning the shelf into conversation starter.
- Identify the hero piece and give it prime real‑estate.
- Apply the 3‑zone rule: base, middle, top.
- Leave 2‑3 cm of breathing space between items.
- Mix textures – smooth with rough, matte with metallic.
- Repeat a dominant colour in small accents.
- Use subtle LED lighting to accent key objects.
Once you tick those boxes, step back, take a sip of coffee, and let the shelf speak for itself.
With these arranging techniques, you’ll turn any plain ledge into a curated vignette that feels both luxe and lived‑in. Keep experimenting – swap a candle for a small sculpture each season, and your living‑room shelves will always feel fresh without a full redesign.
Step 5: Add Personal Touches & Lighting
Now that the big pieces are in place, it’s the little details that turn a shelf from “nice” to “wow”.
Think about the objects that make you smile – a travel‑sized ceramic you picked up in Bath, a framed black‑and‑white photo from your first home, or a hand‑woven basket that smells of lavender. Those personal bits become conversation starters the moment a guest leans in.
Choose a focal story
Start by picking one item that tells a story you love. Place it at eye level, maybe slightly off‑centre, and let the surrounding pieces support it. This “hero” object anchors the whole vignette and gives the shelf a narrative thread.
For example, a carved wooden heirloom can sit beside a sleek metal tray; the contrast of age and modernity feels intentional, not random.
Layer lighting for mood
Lighting is the quiet hero of shelf styling. A warm LED strip tucked behind the back panel adds a soft halo that highlights texture without overwhelming the room.
Do you prefer a cosy glow for evenings or a brighter wash for daytime showcase? A small clip‑on lamp or a string of fairy lights can be swapped depending on the mood you’re after.
Here’s a quick way to test: turn the room lights off, switch on your shelf LED, and step back. If the hero piece glows just enough to draw the eye, you’ve nailed it.
Practical lighting tips
- Use colour‑temperature LEDs (2700‑3000K) for a warm, inviting feel.
- Place a dimmer switch on the strip so you can tone down the light for movie nights.
- Hide the power source behind a decorative box or a sleek wooden casket – it keeps the look seamless.
And don’t forget natural light. If your shelf sits near a window, position reflective items – a metallic tray or a glass vase – to catch the sun’s sparkle in the morning.
So, how do you decide which personal items to showcase?
Curate a rotating “seasonal capsule”
Instead of letting the shelf become a static museum, think of it as a seasonal capsule you refresh every few months. In spring, swap a pastel ceramic for a fresh‑green succulent; in autumn, bring in a copper candle and a dried eucalyptus sprig.
This habit keeps the shelf feeling alive and gives you an excuse to enjoy the process of styling without a full redesign.
Our own clients love the idea of a “three‑item rule”: each season, choose one new statement piece, one supporting accent, and one lighting tweak. It’s a tiny commitment that yields a big visual payoff.
Mix textures, keep it balanced
Texture is the silent language of a shelf. Pair a smooth porcelain jar with a rough jute basket, or a glossy metal sculpture with a soft linen‑wrapped book.
When you mix textures, step back often and ask, “Does this feel cohesive or chaotic?” If the eye jumps around too much, pull back a piece or introduce a neutral spacer – a simple wooden block works wonders.
Remember, negative space is your ally. A gap of 2‑3 cm between objects lets each texture breathe and prevents visual clutter.
Final quick checklist
- Identify a hero piece that tells a personal story.
- Install warm LED lighting with a dimmer.
- Layer a small decorative lamp or fairy lights for mood swaps.
- Rotate three items each season – statement, accent, lighting.
- Mix at least two contrasting textures.
- Leave breathing space between every object.
When you follow these steps, the shelf becomes a living part of your home – a place that reflects who you are, adapts to the time of day, and always feels thoughtfully styled.
Need more inspiration? Check out this roundup of stylish shelf ideas that dive deeper into texture, plants, and lighting stylish shelf decor ideas for living rooms.
Conclusion
So there you have it – a simple, repeatable way to answer the question “how to decorate shelves in living room” without feeling overwhelmed.
Remember the hero piece, the three‑zone layout, a touch of texture, and a splash of warm lighting. Those basics give you a canvas you can swap seasonally, which means the shelf stays fresh even when life gets busy.
If you’re a new homeowner or a couple looking to add a luxe touch, start with one statement item – perhaps a sculptural vase from our luxury wooden cabinets – and build outward. A couple of centimetres of breathing space, a contrasting material, and a dimmable LED strip are all you need to turn a plain ledge into a conversation starter.
And don’t forget to enjoy the process. Pull out your favourite coffee, step back, and ask yourself if the arrangement feels like you. If something feels off, tweak it – styling is a dialogue, not a decree.
Ready to make your living‑room shelves sing? Browse our curated home accessories for that perfect finishing touch, and let your shelves tell the story of your home.
Finally, give yourself a quick end‑of‑week check – glance at the shelf, move one piece if the balance feels off, and enjoy the tiny sense of achievement that comes with a polished look.
FAQ
What’s the first step when I’m not sure where to start?
Start by measuring the shelf’s width, depth and height, then sketch a quick three‑zone layout – base, middle, top. Pull all the objects you own onto the floor, spot the “hero” piece that makes you smile, and give it prime eye‑level real estate. From there, place larger items in the base zone, medium pieces in the middle, and tiny accents at the top. This simple map stops you from guessing and gives you a visual roadmap before you lift a single item.
How many items should I put on a typical living‑room shelf?
Think in terms of visual breathing space rather than a strict count. A good rule of thumb is three to five pieces per shelf, leaving about 2‑3 cm of gap between each. If the shelf is longer than 150 cm, you can break it into two visual clusters, each following the same 3‑5 rule. The trick is to keep the eye moving without feeling crowded – fewer, well‑chosen objects often feel richer than a jam‑packed display.
Can I mix different styles without looking chaotic?
Yes, as long as you anchor the mix with a unifying element such as colour, material or scale. Pair a sleek metal vase with a warm wooden box, and repeat a single accent colour – maybe a brushed gold knob or a muted teal jar – across both. Keep the overall silhouette balanced; if one side feels heavy, swap a piece to the opposite side or introduce a neutral spacer like a small wooden block. Consistency in texture or colour ties the eclectic look together.
What lighting options work best for shelf displays?
Warm LED strips tucked behind the back panel create a soft halo that highlights texture without harsh glare. For a touch of drama, add a small directional spot or a clip‑on lamp aimed at the hero piece. Choose colour temperatures around 2700‑3000 K for a cosy ambience, and consider a dimmer so you can dial the light down for movie nights. A mix of ambient and accent lighting keeps the shelf looking curated at any hour.
How often should I refresh the look of my shelves?
Give yourself a seasonal refresh every three to four months – think spring, summer, autumn, winter. Swap one statement piece, one supporting accent, and tweak the lighting if you like. This “three‑item rule” feels manageable and prevents the shelf from becoming a static museum. Even a tiny change, like swapping a candle for a succulent, injects fresh energy and lets the space evolve with your style.
Is it okay to display personal mementos alongside design pieces?
Absolutely. Personal items add storytelling weight that pure décor can’t provide. Place a framed travel photo or a handcrafted souvenir next to a designer vase, but keep the overall composition balanced – let the memento sit on a small tray or within a neutral frame so it doesn’t dominate. The combination of curated design and meaningful keepsakes creates a lived‑in feel that feels both luxurious and authentically yours.
← Older Post Newer Post →
