Creative Interiors: A Friendly Guide to Inspiring Your Home with Bespoke Furniture and Homeware
Posted by Admin on
Ever walked into a room and felt that instant spark, like the space is whispering, “This is exactly how you imagined your dream home”?
That fleeting moment—when a sofa, a lamp, or a splash of colour suddenly clicks—captures what Creative Interiors are all about.
But most of us stare at blank walls and wonder where to start. You’ve probably flipped through endless Instagram feeds, saved dozens of pins, and still end up with a mix of trends that just don’t speak to you. Trust me, we’ve all been there.
Here’s what I mean: Creative Interiors isn’t about chasing every new style; it’s about curating pieces that echo your personality while keeping the overall vibe cohesive. Think of it as a conversation between you and the space, where each element answers a question you didn’t even know you had.
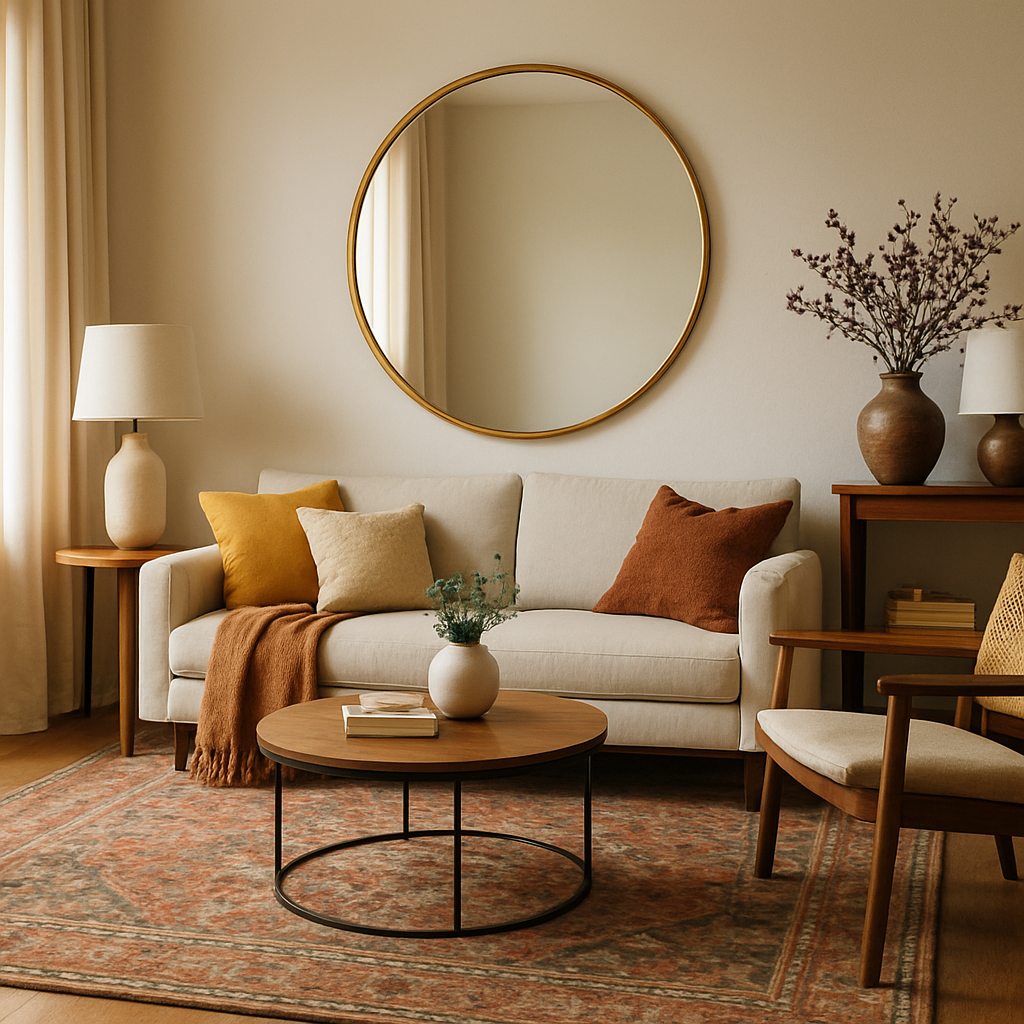
In our experience at Harvey Bruce Interiors, the most rewarding transformations begin with a single focal point—a statement mirror, a handcrafted wooden table, or a bold rug. Once that anchor is in place, the rest of the room falls into rhythm, like a melody finding its harmony.
So, how do you kick off that process without feeling overwhelmed? Start by identifying one area that feels “missing” or under‑used. Maybe it’s the hallway that just leads you from point A to B, or a cozy corner that never gets a second glance. Jot down the vibe you want—calm sanctuary, vibrant studio, timeless elegance—and let that feeling guide your choices.
Next, bring in texture. A mix of velvet cushions, a brushed‑metal lamp, and a woven basket can instantly add depth without a full overhaul. You don’t need to replace everything; a few thoughtfully selected accessories often do the heavy lifting.
And remember, creativity thrives on experimentation. Don’t be afraid to move a piece, swap a colour swatch, or layer a pattern you love. If something feels off, step back, breathe, and try a new arrangement—your home will thank you for the flexibility.
Finally, give yourself permission to enjoy the journey. Creative Interiors is as much about the process as the final look, and every small decision is a step toward a space that feels genuinely yours. Let’s dive in and explore how a few inspired tweaks can transform everyday rooms into showcases of personal style.
TL;DR
Creative Interiors transform ordinary rooms into personalized sanctuaries by blending bespoke furniture, thoughtful accessories, and texture‑rich details that reflect your lifestyle.
Start with one underused spot, add a statement piece or layered textiles, and watch the whole home breathe new confidence and style, effortlessly elevating your everyday living right now.
Step 1: Define Your Style Vision for Creative Interiors
First thing's first – what does your heart actually want when you walk into a room? Maybe it's the calm of a muted palette, or the buzz of a bold colour splash. Whatever it is, pin that feeling down before you even glance at a catalogue.
Grab a notebook and sketch a quick mood board. I like to start with three words that sum up the vibe – think "cozy," "modern," "playful." Then pull images from Instagram, Pinterest, or that glossy magazine you keep on the coffee table. Don’t over‑think it; just let the images speak.
Now, translate those words into concrete design elements. If "cozy" is your mantra, look for plush velvet cushions, warm wood tones, and soft, layered lighting. If "modern" calls you, consider sleek metal frames, monochrome textiles, and minimalistic accessories. The goal is to turn abstract emotions into tangible pieces you can shop for.
Step‑by‑step style audit
1. Walk the space. Stand where you spend the most time – the kitchen island, the sofa, the entryway – and note what feels off. Is the lighting harsh? Is the colour too flat? Jot down the gaps.
2. Identify a focal point. It could be a statement mirror, a sculptural lamp, or a bold rug. This piece will anchor the rest of your vision.
3. Choose a colour anchor. Pick one hue that will repeat in different textures – a deep navy on a sofa, a soft teal in cushions, or a warm amber in wood finishes.
4. List texture priorities. Decide on at least two contrasting textures – think smooth marble beside rough woven basket – to add depth without clutter.
5. Set a budget range. Decide how much you’re comfortable spending on the anchor piece versus accessories. This keeps the project realistic.
Real‑world examples
Take the Smiths, a couple who just bought a Victorian terrace in Edinburgh. They wanted a space that felt "heritage meets contemporary." They started by choosing a reclaimed oak coffee table as their anchor, then layered a charcoal velvet sofa, a brass floor lamp, and a set of hand‑painted ceramic vases. The result? A room that honors the building’s history while feeling fresh.
Another example: Maya, a freelance graphic designer, loved the idea of a "creative studio at home." She defined her vision with the words "inspired," "organized," and "energetic." Her colour anchor became a vibrant mustard wall behind her desk, paired with a sleek white desk, a walnut bookshelf, and a collection of colourful art prints. The contrast of bright and neutral kept the space lively without overwhelming her focus.
What we often see is that once the style vision is crystal clear, the rest of the decisions fall into place like puzzle pieces.
Pro tip from our studio
When you’re unsure about a colour, test it on a small wall swatch or a large poster before committing to paint or upholstery. Light changes the perception dramatically, and a 24‑hour test in morning, afternoon, and evening light can save you from costly re‑paints.
And remember, you don’t have to buy everything at once. Start with the anchor piece, then gradually fill in with accessories that reinforce your vision. Home Interiors: A Creative Guide to Bespoke Furniture, Homeware … offers a great rundown of how to mix and match bespoke items without breaking the bank.
Finally, write down your style vision in one sentence – something like, "I want a serene, textured lounge that feels like a curated gallery." Keep that sentence on your fridge or in your phone notes as a north‑star as you shop.
Step 2: Choose Bespoke Furniture Pieces
Alright, you’ve nailed your style vision, now it’s time to bring in the pieces that will actually make the room breathe.
What does “bespoke” really mean for you?
Think about the moments you spend at home – a coffee table you lean on while reading, a desk that survives your creative mess, a sofa that invites marathon movie nights.
Does a generic, off‑the‑shelf sofa feel like it belongs in your story? Probably not.
Start with a single anchor
Pick one piece that will anchor the space – often a statement chair, a custom‑crafted sideboard, or a reclaimed‑wood coffee table.
That anchor becomes the visual magnet; everything else orbits around it.
In fact, a recent batch of client comments highlighted how a “hand‑made oak table” instantly transformed a dull living room into a conversation starter (see Harvey Bruce Interiors customer feedback).
Measure twice, order once
Grab a tape measure, walk the room, and note the exact dimensions of the area you’ve earmarked.
Leave at least 12‑inch breathing room on each side unless you deliberately want a snug, “tucked‑in” feel.
Sketch a quick floor plan on your phone – the squares help you visualise scale before a single piece arrives.
Mix materials for depth
Pair a sleek metal frame with a warm timber top, or match a plush velvet seat to a matte concrete base.
Contrasting textures keep the eye moving and prevent the space from feeling flat.
Remember the rule: no more than three dominant materials in a single zone. That keeps the look cohesive without feeling chaotic.
Scale matters – big versus small
Large pieces, like a bespoke media console, set the room’s proportion. Smaller accessories, such as sculptural lamps or hand‑woven baskets, add personality.
Ask yourself: “If I stand at the doorway, what should I notice first?” That answer usually points to the biggest bespoke element.
Custom finishes that whisper your story
Choose finishes that echo other elements you love – a brushed‑gold leaf that matches your chandelier, or a weathered pine that ties into exposed beams.
Even a subtle hand‑stamped pattern on a drawer front can become a signature detail.
Budget‑friendly staging
Don’t feel pressured to buy everything at once. Start with the anchor, then layer in complementary pieces as your budget allows.
Many of our clients begin with a bespoke sideboard and later add a matching set of dining chairs when the season changes.
Test the feel before you commit
Order swatches of fabric, wood finishes, or metal colours. Place them against your walls for a day; notice how the light shifts.
Living rooms that get morning sun often look cooler in cool greys, while evening‑lit spaces thrive on warm amber tones.
Don’t forget functionality
Every bespoke piece should solve a problem – extra storage hidden in a coffee table, a pull‑out desk tucked into a console, or a bench that doubles as a shoe rack.
Functionality disguised as design keeps the home feeling effortless.
Final check‑list before you order
- Clear measurements and clearances recorded.
- Material palette limited to three core finishes.
- Anchor piece chosen and visualized in the floor plan.
- Swatches approved for colour and texture.
- Functionality aligned with daily routines.
Cross each item off, and you’ll walk into a room that feels unmistakably yours.
Now that your bespoke furniture is on the way, you’re ready to move on to styling the accessories that will pull the whole look together.
Step 3: Mix and Match Homeware Accessories
Now that your bespoke furniture is on its way, it’s time to have a little fun with the details that turn a room into a true Creative Interiors masterpiece.
Think of accessories as the spices in a dish – a pinch of the right thing can make the whole flavour pop, but too much overwhelms the palate.
Start with a colour story
Pick one or two anchor hues from your furniture – maybe the deep teal of a sofa cushion or the warm brass of a lamp – and let every accessory echo one of those tones.
A simple way to test this is to lay out a few swatches on the floor. A woven rug, a ceramic vase, a set of linen napkins. Step back, look at them together, and ask yourself: does this feel like a conversation or a shouting match?
Layer textures
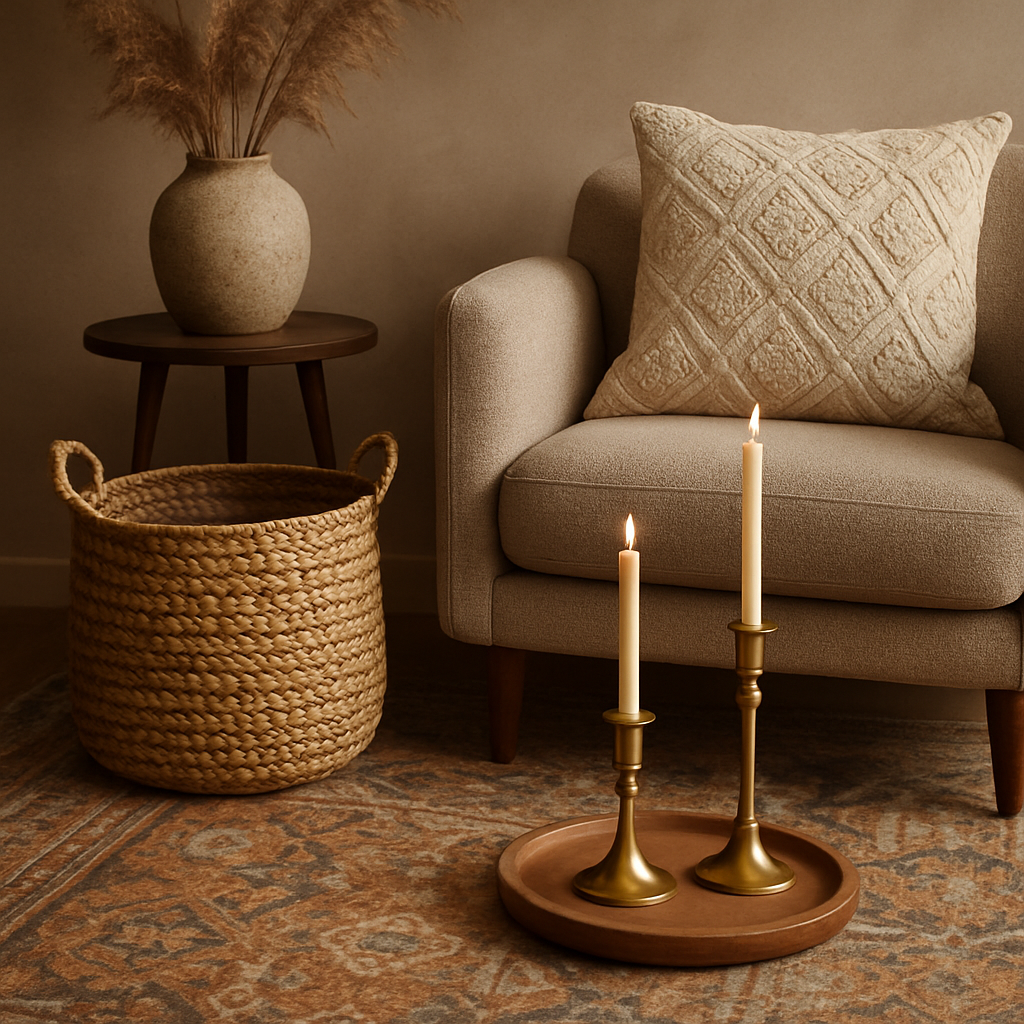
Pair a smooth marble tray with a chunky woven basket, or a glossy glass candle holder with a hand‑tied jute runner. The contrast keeps the eye moving and adds that tactile richness we love in Creative Interiors.
Don’t forget function. A stylish tray isn’t just for looks – it can hold keys, mail, or a cup of tea. A decorative bowl can double as a fruit basket. When beauty serves a purpose, the space feels effortless.
Quick mix‑and‑match checklist
If you’d like a printable guide, use this quick list:
- Choose 1‑2 anchor colours
- Pick 3 textures (smooth, rough, woven)
- Select 2 functional pieces
- Add 1 statement item (sculptural lamp, large artwork)
- Keep the total palette to three finishes
If you’ve got a mantel, try stacking different heights – a slim brass candlestick, a medium‑size ceramic pot, then a tall glass vase. The tiered effect adds visual rhythm without clutter.
Lighting accessories
Metallic table lamps can echo the brass hardware on your sideboard, while a soft linen lampshade softens the glare. Switch them on in the evening and watch the room transform.
Sometimes seeing a real‑life styling session helps lock in ideas, so check out this short video where we walk through a living‑room makeover using just a handful of accessories.
Notice how the designer pulls a patterned rug into the conversation, then adds a handful of curated objects that each tell a tiny story. You can replicate that by grouping items in odd numbers – three or five works best.
Finally, step back and walk around the room. Does each piece feel intentional? If something feels out of place, swap it out or hide it. The goal is a cohesive narrative, not a cluttered showcase.
A pro tip: rotate your accessories seasonally. Swap pastel cushions for richer jewel tones in winter, or trade heavy ceramics for light glass vases in summer. This keeps the space fresh without a full redesign.
Mixing and matching accessories is less about having everything and more about curating a story that reflects you. With these simple steps, your Creative Interiors vision will feel polished, personal, and perfectly lived‑in.
Step 4: Layer Textures and Colors – Comparison of Key Options
Okay, you’ve got your anchor pieces in place, and now it’s time to play with the palette and feel. This is where the magic of Creative Interiors really shows up – a well‑thought‑out mix of texture and colour can make a room feel lived‑in, luxe, and unmistakably yours.
First thing’s first: ask yourself what mood you want the space to breathe. Do you crave the calm of soft neutrals, or are you leaning toward a bold, jewel‑toned drama? The answer will steer every texture you pull in.
Pick a colour anchor, then build around it
Pick one hue from your bespoke sofa, a brass lamp, or even a patterned rug. Let that colour repeat in at least two different materials – think a velvet cushion in deep navy and a woven basket in the same shade. The repetition ties everything together without looking forced.
Still not sure which colour works? Try swapping fabric swatches against a wall for a full day. Light changes can make a teal feel icy in the morning and warm at dusk.
Texture trinity: smooth, rough, woven
We like to keep the texture mix to three families. A smooth marble tray, a rough natural stone bowl, and a woven jute runner give the eye a rhythm that feels intentional.
Why three? More than that can start to feel chaotic, and fewer can look flat. The three‑family rule also makes it easier to shop – you’re looking for one item in each category rather than a dozen random pieces.
Need concrete ideas? The throw‑pillow guide from CoCreative Interiors walks through shape, fill, and fabric choices that fit perfectly into this three‑family approach (see their pillow cheat‑sheet).
Layering strategy step‑by‑step
- Start with the largest texture – a rug, a stone slab, or a wooden coffee table.
- Add a mid‑weight piece – a metal lamp base, a ceramic vase, or a chunky knit throw.
- Finish with a light accent – a glass candle holder, a fringe‑trimmed pillow, or a brass tray.
Each layer should either reinforce the colour anchor or introduce a complementary shade. If you’re using navy as your anchor, a mustard‑yellow cushion can act as a pop of contrast without breaking the flow.
Does this feel overwhelming? Pause, step back, and ask: “If I close my eyes, what texture would I miss the most?” That’s usually the piece you keep and build around.
Seasonal swaps made easy
When the seasons change, you don’t have to redo the whole room. Swap just the softest layer – think switching a linen throw for a velvet one, or swapping pastel pillow covers for richer jewel‑tones. The underlying textures stay the same, so the room still feels cohesive.
Quick tip: keep a small stash of neutral cushions (cream, taupe) that you can slide in whenever you’re unsure about a bold colour. They give the eye a breather.
Comparison table: texture + colour combos
| Texture Family | Colour Strategy | Typical Piece | Pro tip |
|---|---|---|---|
| Smooth | Anchor hue (repeat) | Marble tray or glass vase | Choose a clear or lightly tinted finish to let the colour shine. |
| Rough | Complementary contrast | Stone bowl or reclaimed‑wood box | Leave one edge raw for a tactile surprise. |
| Woven | Accent pop | Jute runner or rattan basket | Match the weave’s undertone to your anchor colour. |
Remember, the goal isn’t to cram every texture you love into one room. It’s to curate a story where each piece answers the question, “What does this add to my Creative Interiors experience?”
So, grab a couple of swatches, lay them out on your sofa, and let the layers speak. When everything feels intentional, you’ll know you’ve nailed the look.
Step 5: Curate a Cohesive Layout with Harvey Bruce Expertise
Ever walked into a room and felt that tiny tug, like something's almost right but the pieces just aren't talking to each other?
That moment is the perfect cue to step back and think about layout, not just décor. In Creative Interiors the magic happens when every element sits in a rhythm that feels both intentional and relaxed.
Start with a “floor plan breathing space”
Grab a sheet of paper, sketch the room’s outline, and block out where your anchor piece lives – maybe that reclaimed‑oak sideboard you fell in love with, or the plush velvet sofa you’ve been eyeing.
Leave at least 12‑inch breathing room around each major item. If you imagine a friend strolling through, can they glide past without bumping into anything? That tiny clearance makes the space feel larger than the walls suggest.
Map the visual flow
Think of the room as a story you’re guiding someone through. Start at the entry point, then lead the eye to the focal point, and finally let it wander to supporting accessories.
One trick we love at Harvey Bruce is to place a subtle rug runner that points toward the anchor. The runner’s line draws the gaze, while the texture adds depth without stealing the spotlight.
Group by “functional zones”
Even a single‑room living area can house multiple activities: reading, entertaining, and maybe a quick home‑office nook. Define each zone with a shared material or colour cue.
For example, pair a metal floor lamp with a set of matte black side tables in the reading corner – the consistent metal finish whispers “these belong together.” Meanwhile, keep the entertainment side soft and warm with a woven basket and a plush throw.
Balance symmetry and surprise
Symmetry feels safe – two matching lamps on either side of a sofa instantly creates order. But a little surprise keeps things alive. Try swapping one lamp for a sculptural piece, or add a bold artwork that breaks the mirror image.
Our clients often find that a single, oversized mirror placed opposite a window not only reflects light but also doubles the sense of space. It’s a classic move that never feels dated.
Layer in texture and colour, but keep a “rule of three”
Choose three texture families – smooth, rough, woven – and let each appear at least once in the room. A glass vase (smooth), a stone bowl (rough), and a jute basket (woven) create a tactile conversation.
Colour-wise, repeat your anchor hue in two different materials and sprinkle a complementary accent. If navy is your anchor, a navy cushion and a navy ceramic plate reinforce it, while a mustard‑yellow throw adds a pop without breaking the flow.
Check the lighting layers
Ambient, task, and accent lighting should each have a purpose. A ceiling dimmer provides the base glow, a floor lamp offers reading light, and a pair of LED candles or a small chandelier adds sparkle.
Switch the lights on at dusk – does the room feel inviting? If shadows hide a corner you love, add a soft uplight or a reflective tray to pull the eye back.
Final “quick‑scan” checklist
- Anchor piece placed with clear breathing room?
- Visual line from entry to focal point?
- Functional zones defined by shared material?
- Symmetry balanced with one unexpected element?
- Three texture families represented?
- Colour anchor repeated, accent added?
- All three lighting layers active?
Run through this list with a cup of tea, and you’ll spot any gaps before they become costly fixes.
When the layout finally feels cohesive, you’ll notice a subtle shift: the room isn’t just filled with beautiful objects; it’s humming with purpose. That’s the hallmark of Creative Interiors – a space that reflects who you are while making everyday living effortless.
Ready to give your layout that polished, lived‑in feel? Take a step back, run the checklist, and let the room breathe. You’ll be amazed at how a few mindful tweaks can turn a good room into a great one.
Conclusion
By now you’ve felt that little spark – the moment a room starts whispering your name instead of shouting trends you never chose. That feeling is the heart of Creative Interiors, where every decision is rooted in what truly makes you smile at home.
We’ve walked through the process step‑by‑step: define a clear style vision, pick one anchor piece that anchors the story, layer textures and colour families, map functional zones, and finally light the space in three layers. Each of those pieces is a simple habit you can test before you buy.
The quick‑scan checklist we built is your safety net: breathing room around the anchor, a visual line from entry to focal point, three texture families, repeated colour anchor, and active lighting layers. Run it with a cup of tea and you’ll spot gaps instantly.
So, what’s the next move? Grab your notebook, sketch the layout one more time, and tick every item on the checklist. If something feels off, trust that instinct – swap, rotate, or pull back. The room will settle into a rhythm that feels lived‑in yet thoughtfully curated.
When you’re ready to bring those ideas to life, remember Harvey Bruce Interiors offers a curated range of bespoke furniture and homewares that fit right into the framework you’ve built. Let’s make your Creative Interiors vision a reality.
FAQ
What exactly are Creative Interiors and how do they differ from regular interior design?
Creative Interiors is a mindset that treats your home like a conversation, not a showroom. Instead of chasing trends, you pick pieces that echo your personality, layer textures, and let a single colour anchor tie everything together. It’s less about matching a designer’s catalogue and more about curating a story you love living in. Think of it as a personal playlist for your rooms, where every item plays a part.
How can I start a Creative Interiors project on a modest budget?
Start small and let curiosity lead. Pick one under‑used corner – maybe the hallway or a reading nook – and test a bold cushion or a handcrafted mirror. Use the quick‑scan checklist we mentioned: ensure 12‑inch breathing room, repeat an existing colour, and add a contrasting texture. Shopping smart means ordering swatches first, borrowing a piece from a friend, or up‑cycling a vintage find before you commit to a custom‑made item.
What’s the best way to choose a statement anchor piece without overwhelming the room?
The anchor piece should feel like the heart of the room, not a wall‑flower. Measure the space first, then visualise a scale that leaves a little breathing room on each side – about a foot works for most sofas or tables. Choose a material that resonates with your daily life; a sturdy oak sideboard for family meals, or a plush velvet chair for quiet reading. Once it’s in place, let the surrounding items orbit around its colour or texture.
How do I blend textures and colours so the space feels cohesive, not chaotic?
Think of texture and colour as teammates that keep each other in check. Stick to the three‑family rule – smooth, rough and woven – and let each appear at least once. Pick one anchor hue (say navy) and repeat it in two materials, then introduce a complementary pop (like mustard) in a third texture. Lay everything out on the floor first; if the palette feels too busy, pull back a layer until the eye can rest comfortably.
Can I incorporate family heirlooms or personal items into a Creative Interiors look?
Absolutely – heirlooms are the secret sauce of Creative Interiors. Start by choosing one piece that already holds meaning, like a grandmother’s silver tray or a vintage armchair, and build your colour anchor around it. If the item is a deep mahogany, repeat that tone in a modern coffee table or a set of cushions. Keep the rest of the room lighter so the cherished object remains the focal point without competing for attention.
How often should I refresh accessories to keep the Creative Interiors vibe alive?
A gentle refresh every six to twelve months keeps the vibe fresh without the stress of a full makeover. Swap out a few cushions, rotate a rug, or introduce a new piece of art that reflects a recent travel memory. Because the core anchor and layout stay the same, you’re only tweaking the accessories layer – that’s the low‑effort, high‑impact part of Creative Interiors. Set a reminder in your calendar and enjoy the seasonal surprise.
What common mistakes should I avoid when trying to achieve Creative Interiors at home?
One common pitfall is over‑decorating – piling on too many colours, textures or objects until the room feels like a showroom. Another is ignoring scale; a massive sofa in a tiny hallway will crush the space. Finally, skipping the quick‑scan checklist can leave you with awkward gaps or missing lighting layers. To avoid these, stick to the three‑texture rule, keep a single colour anchor, and always test a layout on the floor before you commit.
← Older Post Newer Post →
