Media Storage Solutions for Modern Home Interiors
Posted by Admin on
Ever stare at a wall full of cables, a TV that looks like it belongs in a museum, yet still juggle loose cords and scatter‑shot shelves? You’re not alone. The modern home is a hub for streaming, gaming, and family film nights, yet most of us still grapple with untidy media spaces.
Picture this: it’s Sunday evening, the family is queued to watch a new episode and you’re frantically hunting for the remote because the media unit feels like a maze of boxes and tangled wires. That moment of panic is a sign your space needs a rethink.
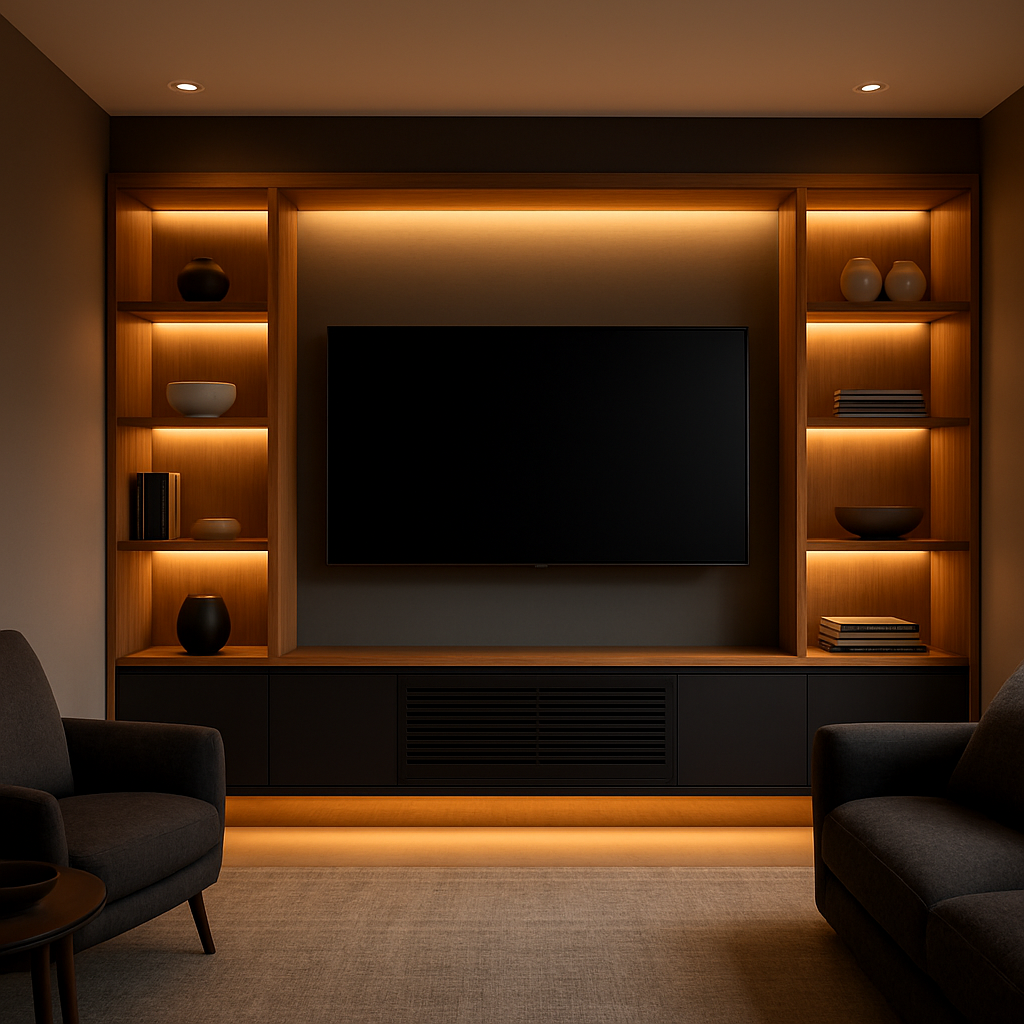
What we’ve found, after seeing hundreds of living rooms transform with the right piece, is that the key isn’t a huge cabinet but a well‑designed unit that blends storage and style. For example, the Curved Oak-ish Media Unit offers a sleek curve that hides cables behind a single panel, giving you a clean line that still feels warm and inviting.
Here’s a quick checklist to get you started: 1) Measure the space where you’ll put the unit—length, height, and depth are vital. 2) Decide whether you need drawers for remotes, a built‑in TV slot, or open shelving for décor. 3) Think about cable management: choose a model with built‑in channels or add a small cable tray. 4) Pick a finish that ties in with your walls and furniture. If you find the process overwhelming, set a 25‑minute focus window to tackle each step—see this guide for how to structure that time: How to Use a 25 Minute Timer with Alarm for Better Productivity.
When you’ve nailed the unit, the difference is immediate: a clutter‑free wall, a clear line of sight to the screen, and the mental relief of knowing everything has a place. And best of all, you’ve added a touch of luxury that elevates the entire room.
TL;DR
We’ve boiled the whole media‑storage makeover down to the essentials you need right now: measure the space, pick a unit that hides cables and gives you that luxe feel, and finish it with a finish that ties the room together. Once you’ve nailed those three steps, a tidy, elegant media zone feels instantly satisfying and instantly raises your whole living room’s style quotient.
Step 1: Assess Your Current Media Storage Needs
First thing’s first: take a breath and look around. Your media space is probably a mix of tech, cables, and a few forgotten DVDs. But how much of that is actually useful, and how much is just clutter you haven’t decided to throw out?
We’re going to walk through a simple audit that feels less like a chore and more like a light‑bulb moment. Ready?
Start with a quick inventory
Grab a clipboard (or your phone) and jot down every item that lives in the media unit: TV, sound system, console, streaming sticks, remotes, DVDs, maybe a handful of vinyls. Don’t skip the “just in case” items like an extra set of cables or a spare game.
Write the quantity next to each. For example: 1 TV, 2 soundbars, 4 game consoles, 3 sets of DVDs. This gives you a concrete sense of how packed you’re really dealing with.
Measure the space you’ve got
Use a tape measure to note the unit’s width, depth, and height. If the unit is a wall‑mounted shelf, measure the wall area it occupies. Knowing the dimensions tells you if the current unit is a good fit or if you’re squishing too much into too little.
Tip: if you’re on the fence about buying a new unit, compare the numbers to the TV’s screen width. A good rule of thumb is to leave at least 4‑8 inches on either side of the screen for balance.
Check the flow of cables
Run a flashlight through the back of the unit or look for built‑in cable channels. Are the wires neatly bundled, or are they a tangled mess that makes you feel like you’re solving a Rubik’s Cube every time you plug something in?
If you see a lot of exposed cables, you’ll want a unit that either has hidden cable trays or you’ll need to plan a separate cable management solution.
Consider how often you’ll access each item
Think about your daily habits. Do you power up the gaming console every evening? Do you only use your streaming stick a couple of times a week? Items you use frequently deserve easy access, while seldom‑used gear can be tucked away.
Action step: label drawers or shelves with the names of devices. It might sound silly, but a quick glance tells you exactly where everything is.
Look for future growth
Maybe you’re planning to add a new 4K TV next year or a home theatre system. Add a buffer of at least 20–30 % extra space in your calculations. That way you won’t have to scramble for a new unit when your tech lineup expands.
Data point: the average home now stores around 1.5 TB of video content across streaming, downloads, and physical media. That’s a lot of data to keep organized.
Want to learn more about the tech behind media storage? Check out the TechReviewPlus guide for a comprehensive review.
Match style with function
Because you’re a homeowner who cares about luxury, choose a unit that not only holds your gear but also complements your décor. A sleek, minimal cabinet might hide cables perfectly, but a wooden media unit can add warmth and character to the room.
Consider a piece from Harvey Bruce Interiors that offers a built‑in TV slot and closed drawers. It keeps your devices tidy and adds a touch of bespoke elegance.
Wrap up with a quick sanity check
Pull everything back together: inventory, measurements, cable flow, usage patterns, future plans, and style. If any point feels off—too tight, too messy, or mismatched—think about whether you’d need to swap the unit or adjust your layout.
Now that you’ve mapped it all out, you’re ready to decide if it’s time to keep, tweak, or replace the current media storage. That’s the first step in turning a chaotic wall into a polished, functional space.
After you’ve watched the quick video guide on organizing media, you can start applying these tactics right away. It’s all about making the space feel like home, not a tech hub.
Step 2: Choose the Right Media Storage System
Now that you’ve mapped out what you need, it’s time to pick the piece that will hold it all. Think of your media storage as the stage where every device gets its spotlight, but without the clutter‑filled drama.
1. Match the size to the space
Measure the width of your TV, then add 8‑12 inches on each side for visual balance. If you’re eyeing a 65‑inch screen, a unit that sits between 75 and 85 inches wide will look natural. If your room feels cramped, go for a slimmer profile or a wall‑mounted option.
Tip: Use a ruler or a piece of string to double‑check your room’s width. A unit that’s a foot too wide feels like a wall that’s been pushed forward.
2. Prioritise cable management
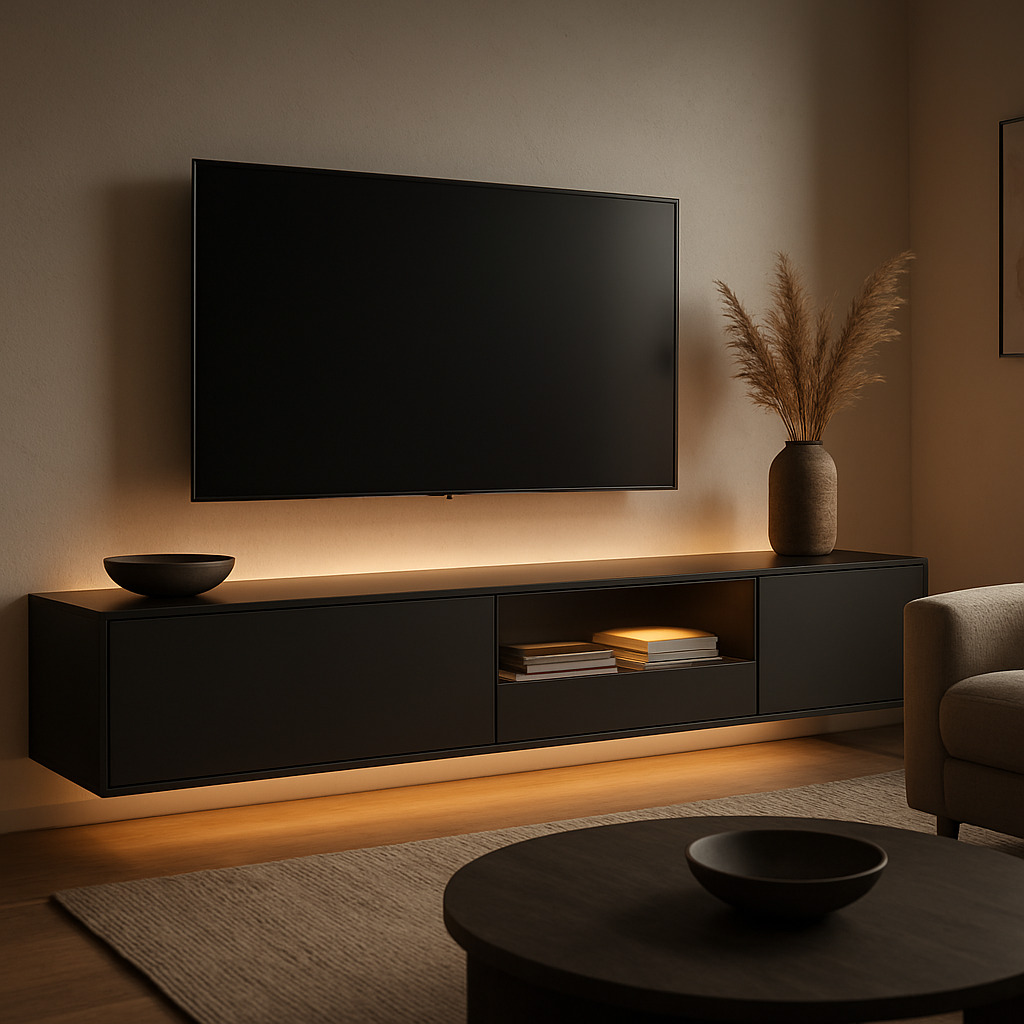
Every wire is a silent chore. A unit with built‑in channels, a hidden tray, or a recessed back panel will keep cords invisible. Architectural Digest’s roundup of TV stands highlights models that combine sleek design with smart cable concealment, making the space feel tidy right from the start. Architectural Digest’s guide to TV stands showcases examples that do just that.
In our experience, a unit that hides cables behind a single panel can transform a wall that once felt like a maze into a clean, calm backdrop for movie nights.
3. Decide on the storage layout
Do you want open shelves to flaunt a few collectibles, or closed drawers for a minimal look? Closed compartments are great for remotes, game discs, and that forgotten HDMI adapter. Open shelves work if you like a display‑friendly vibe.
Consider a hybrid design: a lower level with drawers for quick‑access devices, topped by a clear shelf for a decorative piece or a favorite mug. That way, the unit feels functional but still invites a touch of personality.
4. Keep future growth in mind
Your media habits can change fast—think a new console, a VR rig, or even a smart speaker. Pick a unit that can grow with you. A model that lets you add a second shelf or swap out a drawer for a storage box gives you flexibility.
Data point: The average household stores around 1.5 TB of video content, so a unit that can handle that volume without feeling cramped is a smart long‑term investment.
5. Choose materials that match your décor
If you’re aiming for a luxe feel, a media console in oak or walnut with a matte finish will echo the warmth of a living room sofa. A mid‑century‑modern unit in walnut with clean lines can add a touch of sophistication to a modernist space.
When the unit feels like an extension of the room rather than a separate object, the whole space feels cohesive.
6. Don’t forget about weight and stability
Heavier TVs need a sturdy base. Look for a unit that can support up to the weight of your screen, plus any additional gear. A low-profile stand with a wide base provides stability for larger TVs and reduces wobble.
When you’re choosing a unit, check the manufacturer’s weight specifications and compare them to the weight of your TV and console.
7. Shop smart—use trusted sources
Finding the right unit can feel overwhelming, especially when browsing thousands of options online. Start with a reliable catalog: IKEA’s TV & media storage range offers a mix of budget‑friendly and stylish options, all vetted for quality. IKEA’s TV & media storage range is a solid place to compare dimensions, materials, and price points side by side.
When you’re comparing, focus on the key attributes that mattered in the previous steps: size, cable management, storage type, material, and weight capacity.
Action checklist
• Measure TV width + 8‑12 inches per side. • Choose a unit with hidden cable channels. • Decide between open shelves, closed drawers, or a hybrid layout. • Ensure the unit can handle future tech additions. • Match the finish to your room’s style. • Verify weight capacity matches your TV and accessories. • Compare top options side‑by‑side using trusted catalogs.
By following these steps, you’ll lock in a media storage solution that not only tames the tech chaos but also elevates the look of your living room.
Step 3: Organise and Label Your Media Collection
Now that you’ve chosen a unit, it’s time to make every inch of that space count. Think of your media collection as a small library—every book, DVD, and cable needs a place, a title, and a story. If you treat it like a library, you’ll never lose that missing game controller again.
Start with a quick inventory list
Grab a notepad or your phone and jot down every item that lives in the unit. TV, soundbar, console, streaming sticks, remotes, DVDs, and even spare HDMI cables. Write the quantity next to each. 1 TV, 2 soundbars, 4 game consoles, 3 DVD cases. That simple number line turns chaos into a clear picture.
Why it matters
When you know exactly how many pieces you have, you can decide where they belong—high‑traffic spots for daily gadgets and tucked‑away drawers for seldom‑used gear.
Label everything, then label again
Grab a label maker, or just a sticky note, and write clear names: “Xbox Series X”, “Blu‑ray”, “Remote (A/B)”, “Cables (HDMI, Power)”. Stick them on shelves or drawers. When you’re skimming for a game, you’ll spot it without opening every box.
Double‑label trick
For items you use twice a week, add a second label with a color code or icon. A red circle for “Always on”, a blue triangle for “Weekend use”. The visual cue saves a minute of hunting every time.
Separate the digital from the physical
Digital media—streaming accounts, downloaded movies, music files—are as important as the DVDs. Keep a simple spreadsheet or note where each library or service is stored: Netflix, Disney+, local NAS drive, external SSD. If you’re a fan of the Kingston guide on organizing media collections, it gives great pointers on keeping digital files tidy.
Link to best practice
See Kingston's guide to organizing media collections for deeper insights on sorting digital and physical archives.
Create a ‘quick‑access zone’
Place the most frequently used items—remote, streaming stick, gaming console—on the top shelf or in the front drawer. The idea is to reduce the distance you travel each time you flip a channel or launch a game.
Consider a pull‑out shelf
Some Harvey Bruce units come with a pull‑out, so you can slide out all the gadgets at once. If your unit doesn’t, a shallow shelf with a smooth surface works just as well.
Keep a ‘maintenance routine’ in your calendar
Set a reminder every three months to revisit the inventory list. Swap out old discs, update software, and reorganise cables that have shifted. A quick 10‑minute tidy keeps the space functional for years.
Why labeling and routine matter
People spend an average of 2 minutes looking for a remote in a cluttered room. By labeling and grouping, you shave that time down to seconds. The result? More time for binge‑watching and less frustration.
Checklist for a tidy media collection
- Inventory all items with quantities
- Label shelves and drawers clearly
- Create a separate digital media log
- Place high‑usage items in a quick‑access zone
- Schedule a quarterly tidy‑up
- Use color or icon codes for fast visual cues
| Category | Action | Why It Helps |
|---|---|---|
| Physical Inventory | List each item and its count | Turns chaos into a clear map |
| Labeling | Sticky notes or label maker | Instant recognition, saves search time |
| Digital Archive | Spreadsheet of services and drives | Prevents duplicate downloads and eases backup |
So, what’s the next step? Take a quick inventory, slap on some labels, and give your media unit a clean‑room feel. Once the system is in place, you’ll find that even the most complicated tech lineup feels like a well‑curated gallery—organized, accessible, and totally under your control.
Step 4: Safeguard Your Media with Proper Conditions
So, after you’ve got everything neatly in place, the next big question is: how do you keep those DVDs, game discs, and that precious Blu‑ray collection from turning into a mushy, warped mess?
It’s not about buying the fanciest cabinet; it’s about creating the right environment. Think of your media like delicate heirlooms—you want a safe haven, not a dusty attic.
Temperature is the First Friend or Foe
Even a 20‑degree swing can do damage. Warm rooms dry out plastics, while a cold spot can make your vinyl crack. The sweet spot? Between 55‑75 °F (13‑24 °C). That’s the range most climate‑controlled storage units aim for.
Did you know that a single year of exposure to a hot summer can warp a wooden TV cabinet? That’s why a climate‑controlled unit keeps things steady, regardless of the outside weather.
Humidity: The Silent Saboteur
Moist air loves paper and plastic. If humidity spikes, DVDs can swell; if it drops, they can develop brittle cracks. A controlled environment maintains 30‑50 % relative humidity.
When you’re storing media long‑term, you’re essentially creating a museum setting. That’s what a climate‑controlled space offers—no mold, no mildew, no surprise warping.
Practical Steps for Home Media
1. Keep the unit dry. Use silica gel packets or a dehumidifier if you’re in a damp area. Small, inexpensive.
2. Avoid direct sunlight. UV rays can fade labels and degrade plastics. Position the unit out of windows or use blinds.
3. Store in airtight cases. Even the best climate control can’t fix a case that’s already letting moisture in.
4. Label and track. A quick spreadsheet or a simple note on the back of each case reminds you when you last checked it.
When to Consider a Climate‑Controlled Storage Unit
Think about the items you’re protecting: wooden furniture, leather headphones, classic vinyls, or even your collection of high‑definition Blu‑ray discs. If any of those are stored for more than a year, a climate‑controlled unit is worth the extra cost.
Shield Storage explains the science behind climate control and why it matters for media and more: Climate‑controlled storage guide.
Quick Check‑List Before You Finalise
- Is the unit rated for 55‑75 °F?
- Does it maintain 30‑50 % relative humidity?
- Is it away from direct sunlight and heat sources?
- Do you have airtight storage cases?
- Have you labeled everything?
When you tick all these boxes, you’re not just saving your media—you’re preserving memories for generations.
Now, imagine a winter morning, you pull the door open, and your DVDs are crisp, your Blu‑ray discs look brand new, and your gaming console is ready to roll. No warping, no mildew—just pure, reliable storage.
And that’s the feeling you’ll get once you’ve set up a climate‑controlled environment for your media.
Ready to step up your media care routine?
We’ve walked you through the why and the how. The next step? Pick the right storage unit or climate‑controlled solution and give your media the home it deserves.
Step 5: Integrate Media Storage into Your Home Décor
Once you’ve got the right unit on the shelf, the next big move is to make it feel like part of the room instead of a tech‑bulb that pops out of nowhere. Think of your media storage as a hidden character in a film: it needs to support the story without stealing the spotlight.
So, what’s the trick? Start with colour and texture. If your living room is all warm oak and soft linen, choose a media unit that echoes those tones. A chestnut or walnut finish will blend seamlessly, and a brushed brass finish can add a subtle luxury cue without shouting.
Does that make sense for you? If you’re leaning toward a mid‑century vibe, a unit with clean lines and a matte finish will anchor the space. For a more eclectic look, a media piece with a slight twist—like a curved edge—lets you play with geometry while still keeping the tech contained.
In our experience, pairing a media unit with a matching sideboard or a console that mirrors the same material can create a cohesive visual line. It’s a subtle cue that tells the eye the whole room is one thought‑out design. Our collection offers a range of options that play well with both contemporary and traditional interiors.
1. Positioning for Flow
Place the media unit so it doesn’t block natural light or key windows. A slightly recessed stance can give the illusion of depth, and it lets you keep a small plant or a framed photo in front without crowding the tech.
Step into the space and imagine walking through. If you’re pulling the unit forward, you’ll create a focal point; if you slide it back a couple of inches, you’ll preserve room for other furnishings.
2. Layering with Accessories
Think of the media unit as the base layer. Layer on top with a slim, low‑profile tray for remotes, a sleek glass co‑tainer for your favourite mug, or a narrow shelf for a decorative figurine. The key is to keep the surface uncluttered—just enough to add personality without creating a visual mess.
Want a quick trick? Use a shallow tray that sits flush against the unit; this keeps items from rolling off while still letting the unit’s finish breathe.
3. Harmonise Lighting
Ambient lighting can make or break the feel. A soft LED strip behind the unit will highlight the profile and create a halo effect, especially during movie nights. If you’re going low‑key, a small table lamp on a sideboard can add a touch of warmth.
Remember, the light should compliment the material, not overpower it. A warm LED will enhance oak tones, while a cool white will make a walnut finish pop.
4. Use Built‑in Cable Channels Wisely
Hidden channels keep cords invisible, but they’re also a design asset. When you choose a unit with built‑in pathways, you can add a discreet decorative strip—think a thin wood plank or a brushed metal band—to frame the cable area. It’s a simple way to turn a utilitarian feature into a style statement.
Does this feel doable? If you’re worried about the extra step, just remember it’s a one‑time tweak that saves you hours of cable juggling later.
5. Create a Visual Hierarchy
Place the most frequently used items in the easiest spot: a pull‑out shelf for your console and a front drawer for the remote. Above that, keep less‑used items—like a spare HDMI or a set of legacy DVDs—in a second drawer or an upper shelf. The result is a natural flow that matches how you use your media.
In practice, this means you can grab what you need without digging through a maze of boxes. Think of it as a personal concierge for your entertainment.
6. Final Touch: Texture Play
Finish the look with a soft throw or a small rug in front of the unit. It adds a tactile layer that invites you to sit, relax, and enjoy the space. The rug also helps define the zone, making it feel intentional rather than accidental.
At the end of the day, integrating media storage into your décor is about marrying function with aesthetic. By choosing the right material, positioning it thoughtfully, and adding a few intentional accessories, you turn a plain tech space into a curated corner that feels both luxurious and lived‑in.
So, grab that unit, place it where it feels right, and let the rest of the room follow. Your living area will thank you—and so will the remote.
Deep‑Dive: Future Trends and Innovations in Media Storage
Remember that day when your living room felt like a command centre? Imagine a future where the media unit not only hides cables but also anticipates your needs.
Storage volumes are exploding
According to a recent survey, the professional media and entertainment market is set to surpass 180 exabytes of storage in 2024, climbing toward 300 exabytes in three years. That’s the space required to keep every 4K shot, every AI‑generated effect, and every archived title. Source
Local network storage accounts for roughly 68 exabytes, while cloud‑based solutions hold 63 exabytes. The split means that hybrid systems—on‑premise shelves paired with cloud vaults—are becoming the norm.
AI is turning data into a playground
Think of AI as a librarian that can read your mind. It tags, indexes, and even predicts which clips you’ll want to pull next. For home owners, that translates to smarter media libraries where a simple voice command pulls up the exact episode you’re craving.
What’s exciting is that AI is now capable of organising high‑resolution archives without human oversight, cutting editing time from hours to minutes.
Eco‑friendly storage: the next luxury
More sustainable solutions are emerging, driven by the demand for lower power consumption and better heat dissipation. Brands are now offering modular racks that use passive cooling and recycled materials, aligning with a growing preference for green living spaces.
For instance, a wall‑mounted unit made from sustainably sourced oak can integrate a built‑in heat‑managed drive bay, keeping data safe while looking beautiful.
Practical steps you can take today
- Audit your current media volume: estimate how many hours of footage you already own.
- Choose a hybrid strategy: pair a high‑capacity NAS with a cloud tier for hot data.
- Invest in AI‑enabled cataloguing software that auto‑tags new files.
- Prioritise energy‑efficient drives; look for those with low‑power modes.
- Schedule quarterly reviews to retire obsolete files and re‑allocate space.
Need a visual cue? Check out how professionals are layering storage solutions in their studios—this article provides a clear illustration. Houzz article
And because storage is often a silent partner, make sure the unit’s design matches your living room’s aesthetic—warm wood tones pair beautifully with soft lighting, creating a seamless blend.
Finally, remember that the goal is to make the storage system feel as natural as a coffee table. When it’s invisible and efficient, the room breathes, and the media stays safe for generations.
FAQ
1. How do I pick a media unit that keeps cables hidden?
First, look for built‑in cable trays or a recessed back panel. Those tiny details mean you never see the jungle of wires again. When you walk by, the unit should feel like a clean rectangle, not a maze. If you’re unsure, run a flashlight behind the unit – a clear channel should pop out like a secret hallway.
2. What materials should I consider if I want a sustainable look?
Oak and walnut are great because they’re renewable and age beautifully. A matte finish protects the grain while keeping the look soft. If you prefer a lighter touch, bamboo or reclaimed pine can add warmth without the heavy feel. Think about the room’s light: warm woods shine in soft daylight; cool woods look sharper under LED.
3. How can I make my media space feel luxurious without overbuying?
Start with a single statement piece, like a curved oak unit that hides cables, then layer small accents: a brushed‑metal tray for remotes, a glass jar for coasters, a small rug in front. The trick is balance – one eye‑catching piece plus a few curated objects. It feels high‑end because you’re curating, not cluttering.
4. Should I get a pull‑out shelf or just flat open space?
Pull‑outs give quick access and keep items flat, which reduces dust. They’re also great for gadgets that need ventilation. Flat shelves are lighter and cheaper, but you risk items sliding. If you’re a frequent gamer or a streaming enthusiast, a pull‑out makes it feel effortless to grab your console or stick.
5. How often should I revisit my media storage layout?
Set a quarterly reminder to walk through the unit. Check if cables are still tidy, if new devices need space, and if any old items can be moved to the cloud. A 15‑minute “tech audit” keeps the unit from turning into a time‑bomb of forgotten gadgets.
6. What’s the easiest way to keep my media safe from heat and humidity?
Place the unit away from direct sunlight and keep it in a room with a stable temperature—ideally between 55 and 75 °F. A small dehumidifier or silica gel packets can keep moisture at bay. If you live in a damp area, consider a unit with a sealed back panel to block humidity from creeping in.
Conclusion
We’ve walked through the whole media‑storage journey—from the first inventory to the final polish. If you’ve read this far, you’re already on the right track.
Remember, the goal isn’t a neat shelf; it’s a space that feels like home. Keep your unit in a cool spot, use pull‑out drawers for quick‑access gear, and label everything. It’s the tiny details that save you minutes every time you hunt a remote.
In a world where gadgets pile up faster than we can unplug them, a well‑thought‑out layout is the only way to stay sane. Think of your unit as the heart of the room—your media should feel alive, not like a museum exhibit.
So, what’s the next step? Take a quick walk around, jot down any lingering clutter, and swap a drawer for a pull‑out if that feels right. Then, give yourself a quarterly “tech audit” to keep the system fresh.
We’re proud to share these insights from our own experience working with luxury interiors. Your home deserves a media space that’s both functional and elegant. Let’s keep it simple, sustainable, and stylish. Enjoy the peace that comes with knowing everything is just a pull away and you can finally breathe easier today.
← Older Post Newer Post →
